CO2 traffic light
In this project, we will show you how to program a CO2 traffic light with CircuitPython. The CO2 traffic light measures the CO2 concentration in the air and shows you whether the air quality in your room is good or poor.
Materials
- senseBox MCU-S2
- 1x LED-Matrix
- 1x SCD30 CO2 sensor
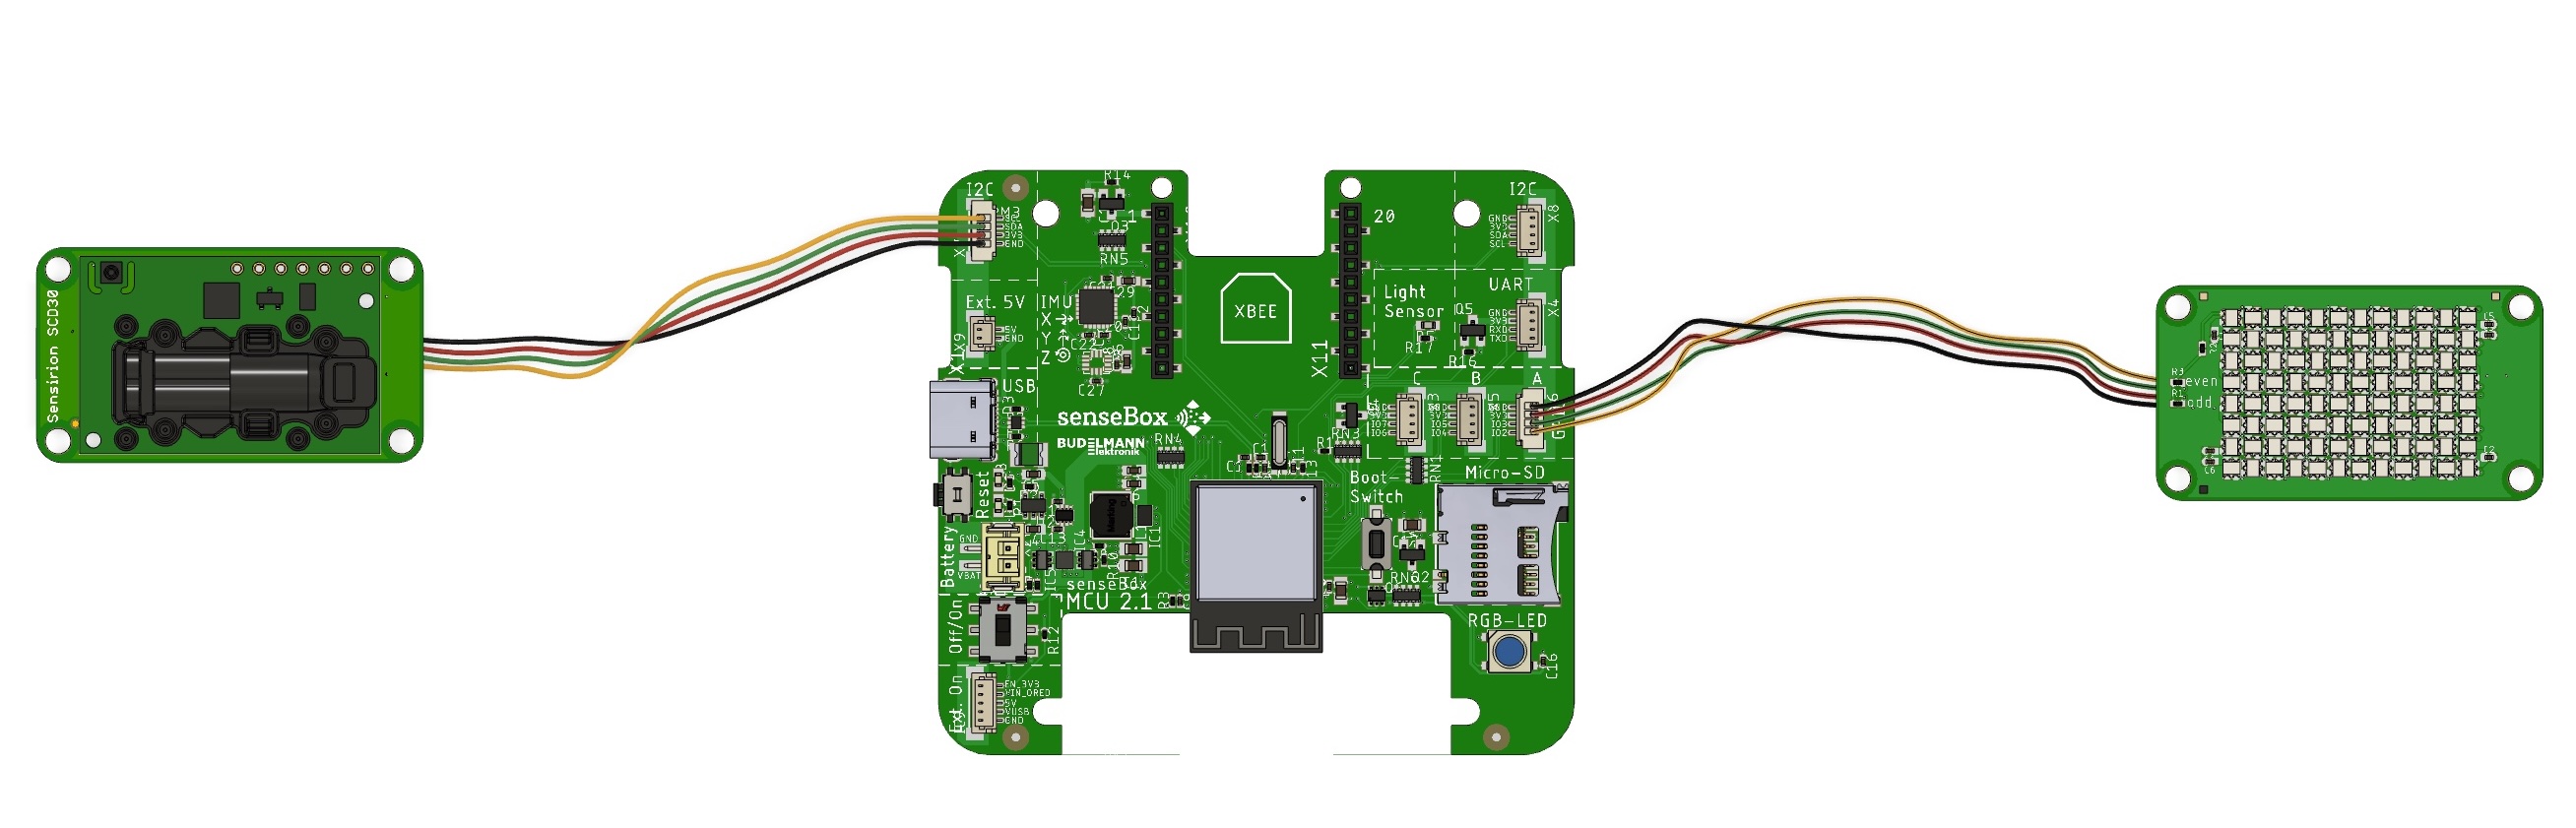
Setup
Connect the SCD30 CO2 sensor to the senseBox MCU-S2 via I2C. Connect the LED matrix to GPIO A.
Programming
Installing libraries
To use the SCD30 CO2 sensor and LED matrix with CircuitPython, you need to install the following libraries:
- Adafruit Bus Device
- Adafruit Register
- Adafruit NeoPixel
- Adafruit Framebuf
- Adafruit Pixel Framebuf
- Adafruit LED Animation
- Adafruit SCD30
You can download the libraries here and copy them to the lib folder on your senseBox MCU-S2.
Program code – import libraries
Import the required libraries and initialise the SCD30 CO2 sensor and the LED matrix.
import board
import neopixel
import digitalio
from adafruit_pixel_framebuf import PixelFramebuffer
import time
import adafruit_scd30
import math

# IO Enable
io_enable_pin = digitalio.DigitalInOut(board.IO_POWER)
io_enable_pin.direction = digitalio.Direction.OUTPUT
io_enable_pin.value = False

# SCD30 CO2
i2c = board.I2C()
scd = adafruit_scd30.SCD30(i2c)

# LED Matrix
pixel_pin = board.D2
pixel_width = 12
pixel_height = 8
num_pixels = pixel_width * pixel_height
pixels = neopixel.NeoPixel(
    pixel_pin, num_pixels, brightness=0.05, pixel_order=neopixel.GRB, auto_write=False
)
Program code - Pixel framebuffer
You can control the LED matrix with the pixel framebuffer. Create a pixel framebuffer object and initialise it with the pixels, width and height of the LED matrix.
pixel_framebuf = PixelFramebuffer(
    pixels,
    pixel_width,
    pixel_height,
    alternating=True,
)
Program code – Map function
The Map function transforms a value from one range to another. In this case, the CO2 concentration value is transformed into a value between 1 and the width of the LED matrix.
# Map function transform value from one range to another
def mapRange(value, inMin, inMax, outMin, outMax):
    value = outMin + (((value - inMin) / (inMax - inMin)) * (outMax - outMin))
    return math.floor(value)
Program code - Loop
In the while loop, you check whether data from the SCD30 CO2 sensor is available. If data is available, the CO2 concentration is measured in ppm and transformed into a value between 1 and the width of the LED matrix. The LED matrix is then filled with the corresponding colour.
while True:
    if scd.data_available:
        co2_value = scd.CO2
        width = mapRange(co2_value, 400, 2000, 1, pixel_width)
        color = 0xFF0000
        if(co2_value < 1000):
            color = 0x00FF00
        elif(co2_value < 1500):
            color = 0xFFFF00
        pixel_framebuf.fill(0x000000)
        pixel_framebuf.fill_rect(0, 0, width, pixel_height, color)
        pixel_framebuf.display()
Here you can find the entire code
import board
import neopixel
import digitalio
from adafruit_pixel_framebuf import PixelFramebuffer
import time
import adafruit_scd30
import math

# IO Enable
io_enable_pin = digitalio.DigitalInOut(board.IO_POWER)
io_enable_pin.direction = digitalio.Direction.OUTPUT
io_enable_pin.value = False

# SCD30 CO2
i2c = board.I2C()
scd = adafruit_scd30.SCD30(i2c)

# LED Matrix
pixel_pin = board.D2
pixel_width = 12
pixel_height = 8
num_pixels = pixel_width * pixel_height
pixels = neopixel.NeoPixel(
    pixel_pin, num_pixels, brightness=0.05, pixel_order=neopixel.GRB, auto_write=False
)

pixel_framebuf = PixelFramebuffer(
    pixels,
    pixel_width,
    pixel_height,
    alternating=True,
)

# Map function transform value from one range to another
def mapRange(value, inMin, inMax, outMin, outMax):
    value = outMin + (((value - inMin) / (inMax - inMin)) * (outMax - outMin))
    return math.floor(value)

while True:
    if scd.data_available:
        # Zeige CO2-Konzentration als Rechteck an
        co2_value = scd.CO2
        # Transform CO2 value (400 - 2000 ppm) to pixel width (1 - pixel_width)
        width = mapRange(co2_value, 400, 2000, 1, pixel_width)
        color = 0xFF0000                                  # CO2 value >= 1500 ppm -> red
        if(co2_value < 1000):                             # CO2 value < 1000 ppm -> green
            color = 0x00FF00
        elif(co2_value < 1500):                           # CO2 value < 1500 ppm -> yellow
            color = 0xFFFF00
        pixel_framebuf.fill(0x000000)                     # Clear LED Matrix before drawing
        pixel_framebuf.fill_rect(0, 0, width, pixel_height, color)
        pixel_framebuf.display()
Your CO2 traffic light
You did it! You programmed a CO2 traffic light with CircuitPython. Now you can measure the CO2 concentration in your room and monitor the air quality. The LED matrix shows you whether the air quality is good or poor. If the CO2 concentration is high, the LED matrix turns red; if the CO2 concentration is low, the LED matrix turns green. Press the button to display the current CO2 concentration in ppm.
Enjoy your CO2 traffic light!🚦
Expert task
Try to expand the CO2 traffic light by pressing the button to display the CO2 concentration in ppm.
Font
Download the font5x8.bin file and copy it to the CIRCUITPY folder on your senseBox MCU-S2. This will allow you to display text on the LED matrix.
Add button
Add the button and set it as input. Store the current state of the button in the btn_state variable.
# BTN
btn = DigitalInOut(board.BUTTON)
btn.direction = Direction.INPUT
btn.pull = Pull.UP
btn_state = btn.value
In the while loop, you check whether the button has been pressed. If the button has been pressed, the CO2 concentration in ppm is displayed on the LED matrix.
while True:
    btn_state = btn.value
    if btn_state:
        time.sleep(0.05)
        btn_state = btn.value

    time.sleep(0.1) # sleep for debounce
    ...
Show text
You can now use btn_state to check the status of the button. Use an if query for this. When the button is pressed, the CO2 concentration in ppm is displayed on the LED matrix.
if btn_state:
   # Display CO2 concentration as a rectangle
   ...
else:
    # Display CO2 concentration as text
    text = "CO2: " + str(scd.CO2) + " ppm"
    for i in range(6 * len(text) + pixel_width):                    # Text scrolls from right to left
        pixel_framebuf.fill(0x000000)
        pixel_framebuf.text(text, pixel_width - i, 0, 0xFF00FF)
        pixel_framebuf.display()
        time.sleep(0.05)                                            # scroll speed
Here you can find the complete code for the expert task
import board
import neopixel
import digitalio
from adafruit_pixel_framebuf import PixelFramebuffer
import time
import adafruit_scd30
import math
from digitalio import DigitalInOut, Direction, Pull

# IO Enable
io_enable_pin = digitalio.DigitalInOut(board.IO_POWER)
io_enable_pin.direction = digitalio.Direction.OUTPUT
io_enable_pin.value = False

# SCD30 CO2
i2c = board.I2C()
scd = adafruit_scd30.SCD30(i2c)

# BTN
btn = DigitalInOut(board.BUTTON)
btn.direction = Direction.INPUT
btn.pull = Pull.UP
btn_state = btn.value

# LED Matrix
pixel_pin = board.D2
pixel_width = 12
pixel_height = 8
num_pixels = pixel_width * pixel_height
pixels = neopixel.NeoPixel(
    pixel_pin, num_pixels, brightness=0.05, pixel_order=neopixel.GRB, auto_write=False
)

pixel_framebuf = PixelFramebuffer(
    pixels,
    pixel_width,
    pixel_height,
    alternating=True,
)

# Map function transform value from one range to another
def mapRange(value, inMin, inMax, outMin, outMax):
    value = outMin + (((value - inMin) / (inMax - inMin)) * (outMax - outMin))
    return math.floor(value)

while True:
    btn_state = btn.value
    if btn_state:
        time.sleep(0.05)
        btn_state = btn.value

    time.sleep(0.1) # sleep for debounce

    if scd.data_available:
        if btn_state:
            # Display CO2 concentration as a rectangle
            co2_value = scd.CO2
            width = mapRange(co2_value, 400, 2000, 1, pixel_width)
            color = 0xFF0000
            if(co2_value < 1000):
                color = 0x00FF00
            elif(co2_value < 1500):
                color = 0xFFFF00
            pixel_framebuf.fill(0x000000)
            pixel_framebuf.fill_rect(0, 0, width, pixel_height, color)
            pixel_framebuf.display()
        else:
            # Display CO2 concentration as text
            text = "CO2: " + str(scd.CO2) + " ppm"
            for i in range(6 * len(text) + pixel_width):
                pixel_framebuf.fill(0x000000)
                pixel_framebuf.text(text, pixel_width - i, 0, 0xFF00FF)
                pixel_framebuf.display()
                time.sleep(0.05)
</div>