senseBox TTN Mapper
The goal is to develop a senseBox TTN mapper with LoRaWAN module. The data will be sent via the free network TheThingsNetwork to the TTN Mapper Application. The TTN Mapper is an application to identify places with LoRaWAN connectivity. With our senseBox we want to contribute to the platform.
Hardware
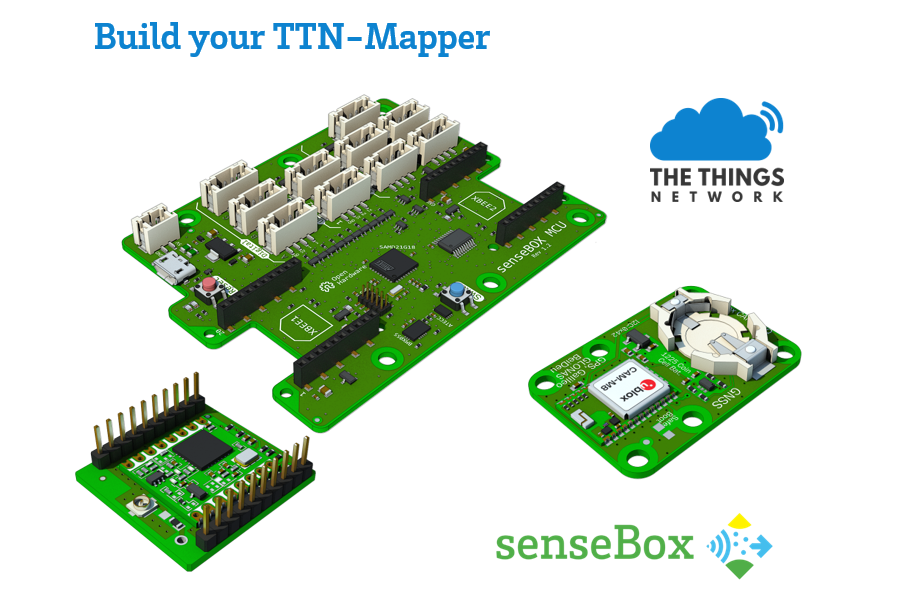
You will need a senseBox MCU, a LoRa-Bee and a GPS module. You can find a set of those in our shop: https://sensebox.kaufen
Start by connecting the LoRa-Bee to XBEE1 on your senseBox MCU. Additionally, connect the GPS module via I2C to the senseBox MCU. You are now ready to go.
Additionally, you will need a mobile power supply. The easiest way is a USB powerbank or a battery that is compatible with the senseBox MCU connector.
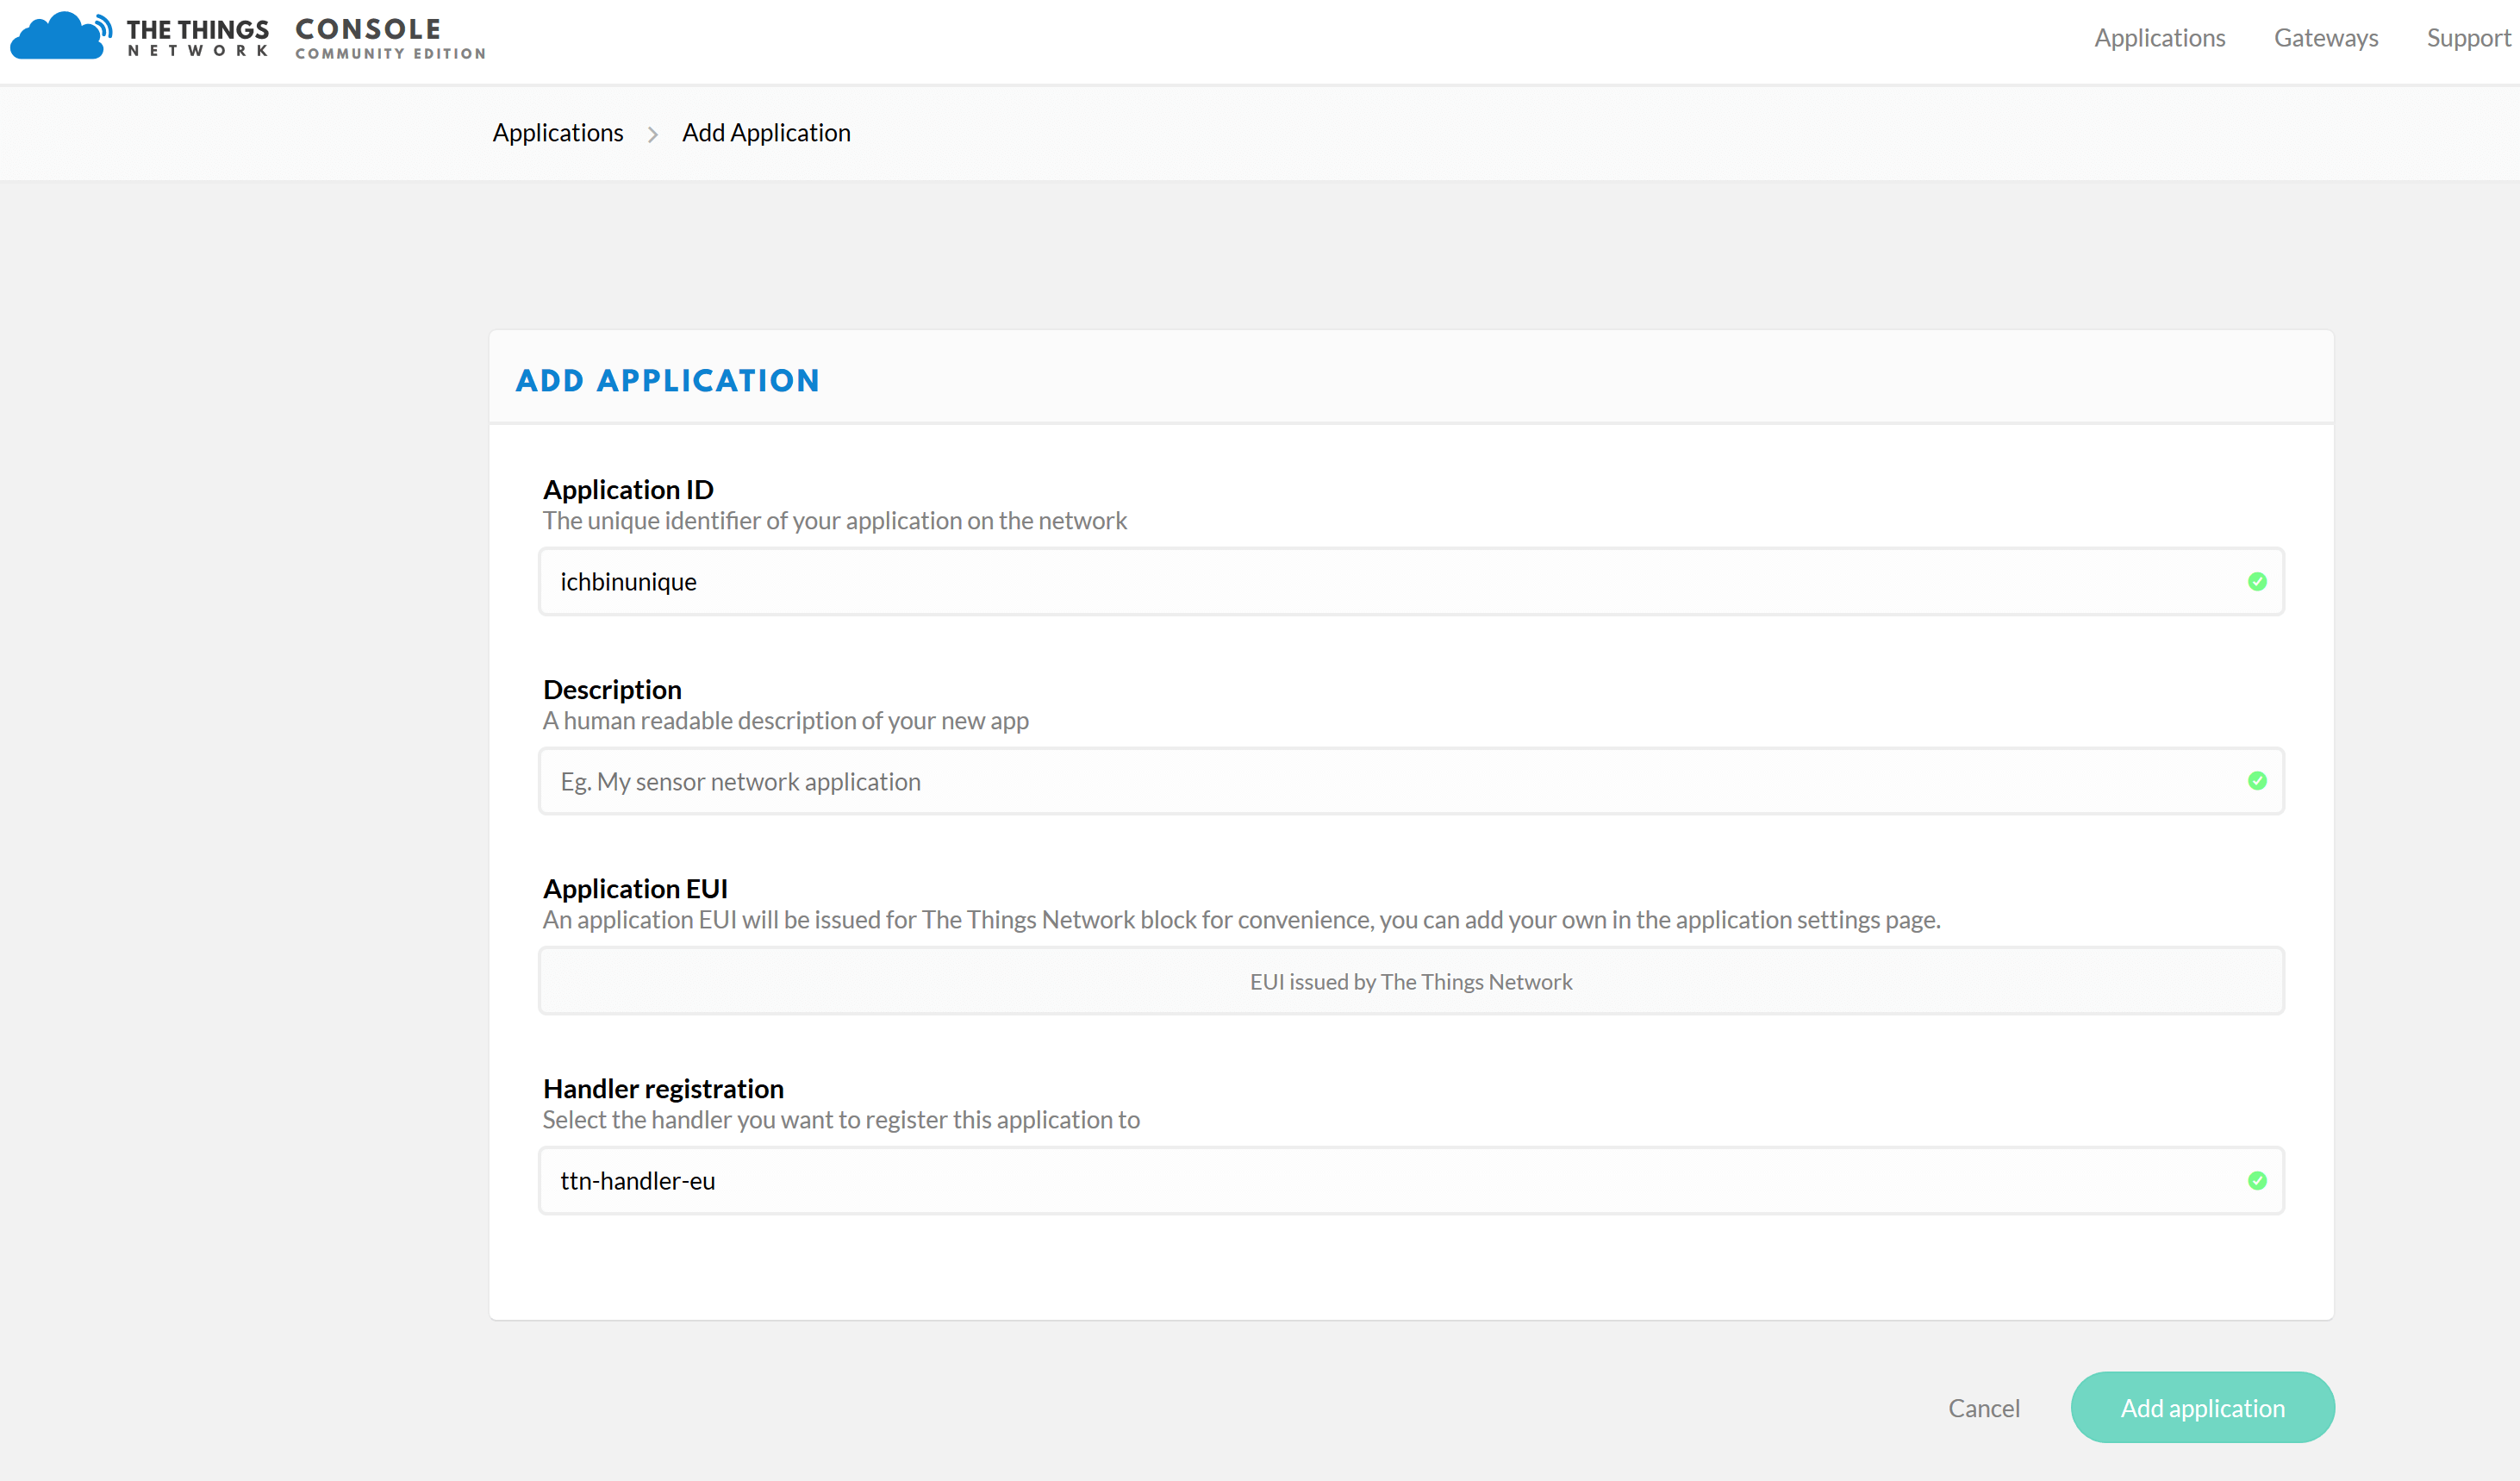
Registration at TheThingsNetwork
Visit the website thethingsnetwork.org and create an account. If you are logged in, visit the TTN Console. Click on “Applications” and create a new application on the following page. Enter an “Application ID” there, which is unique. Leave all other options unchanged.
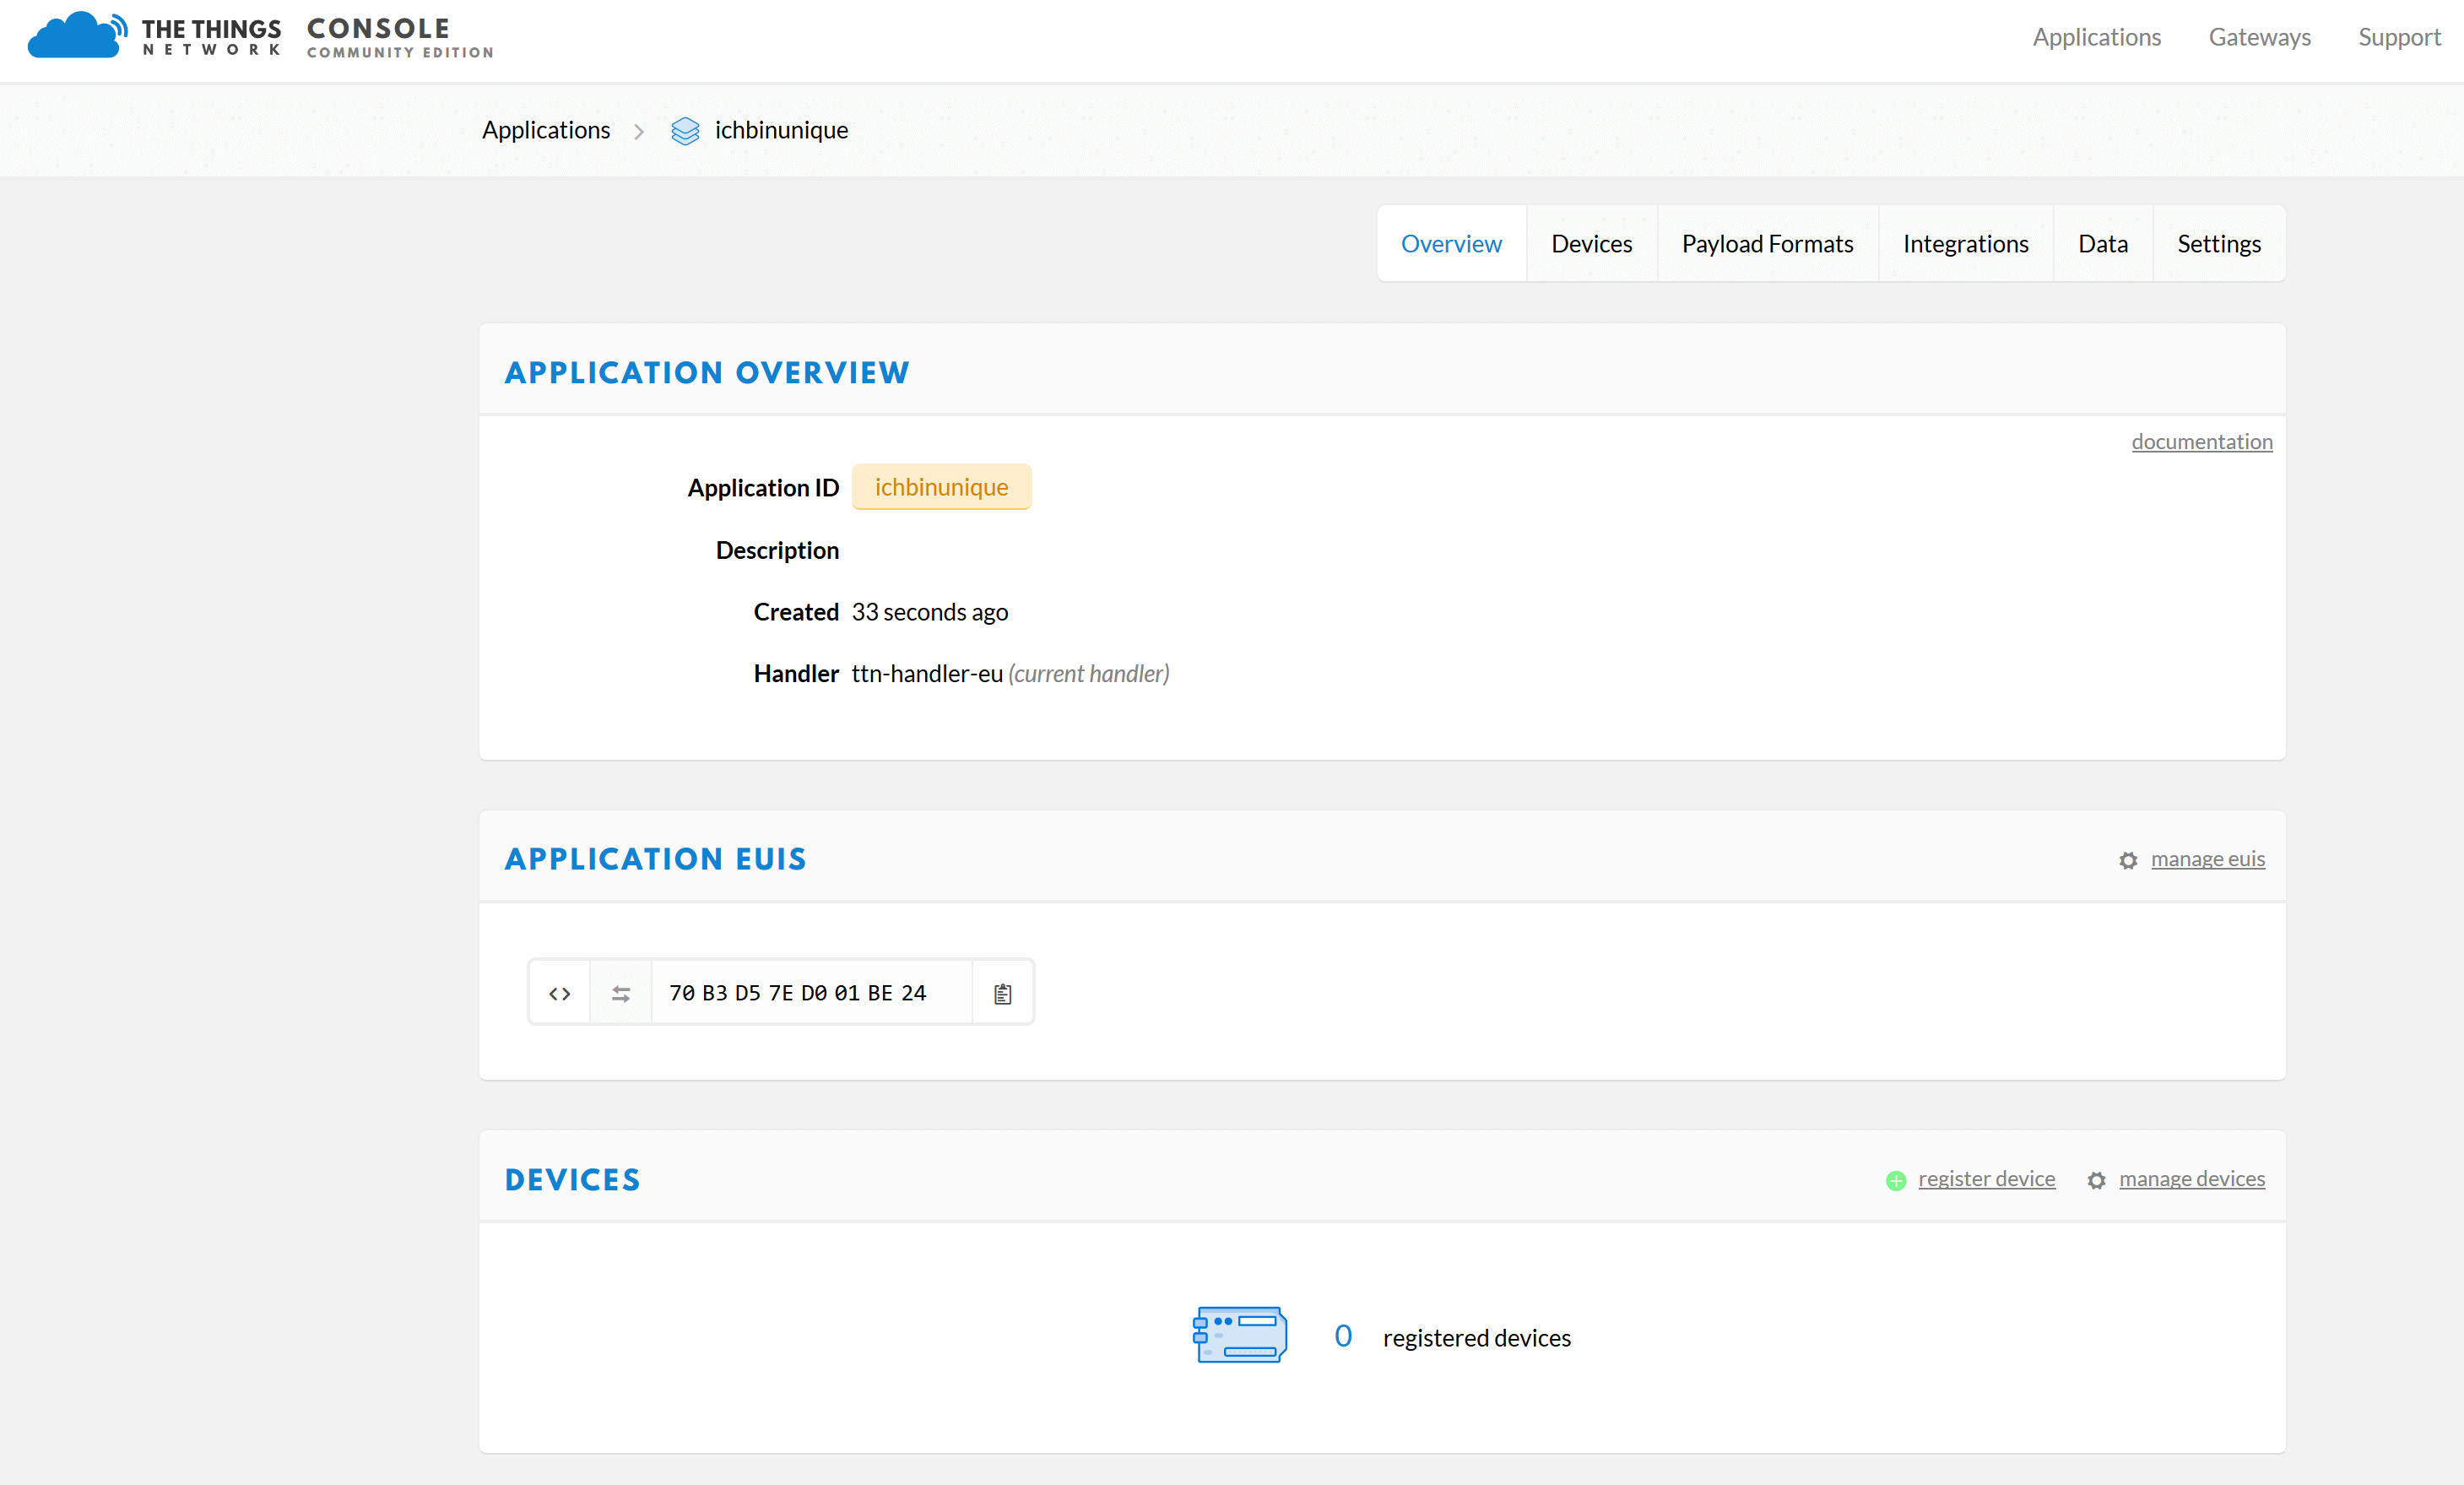
Then you will get an overview with the selected “Application ID” and the “Application EUIS”.
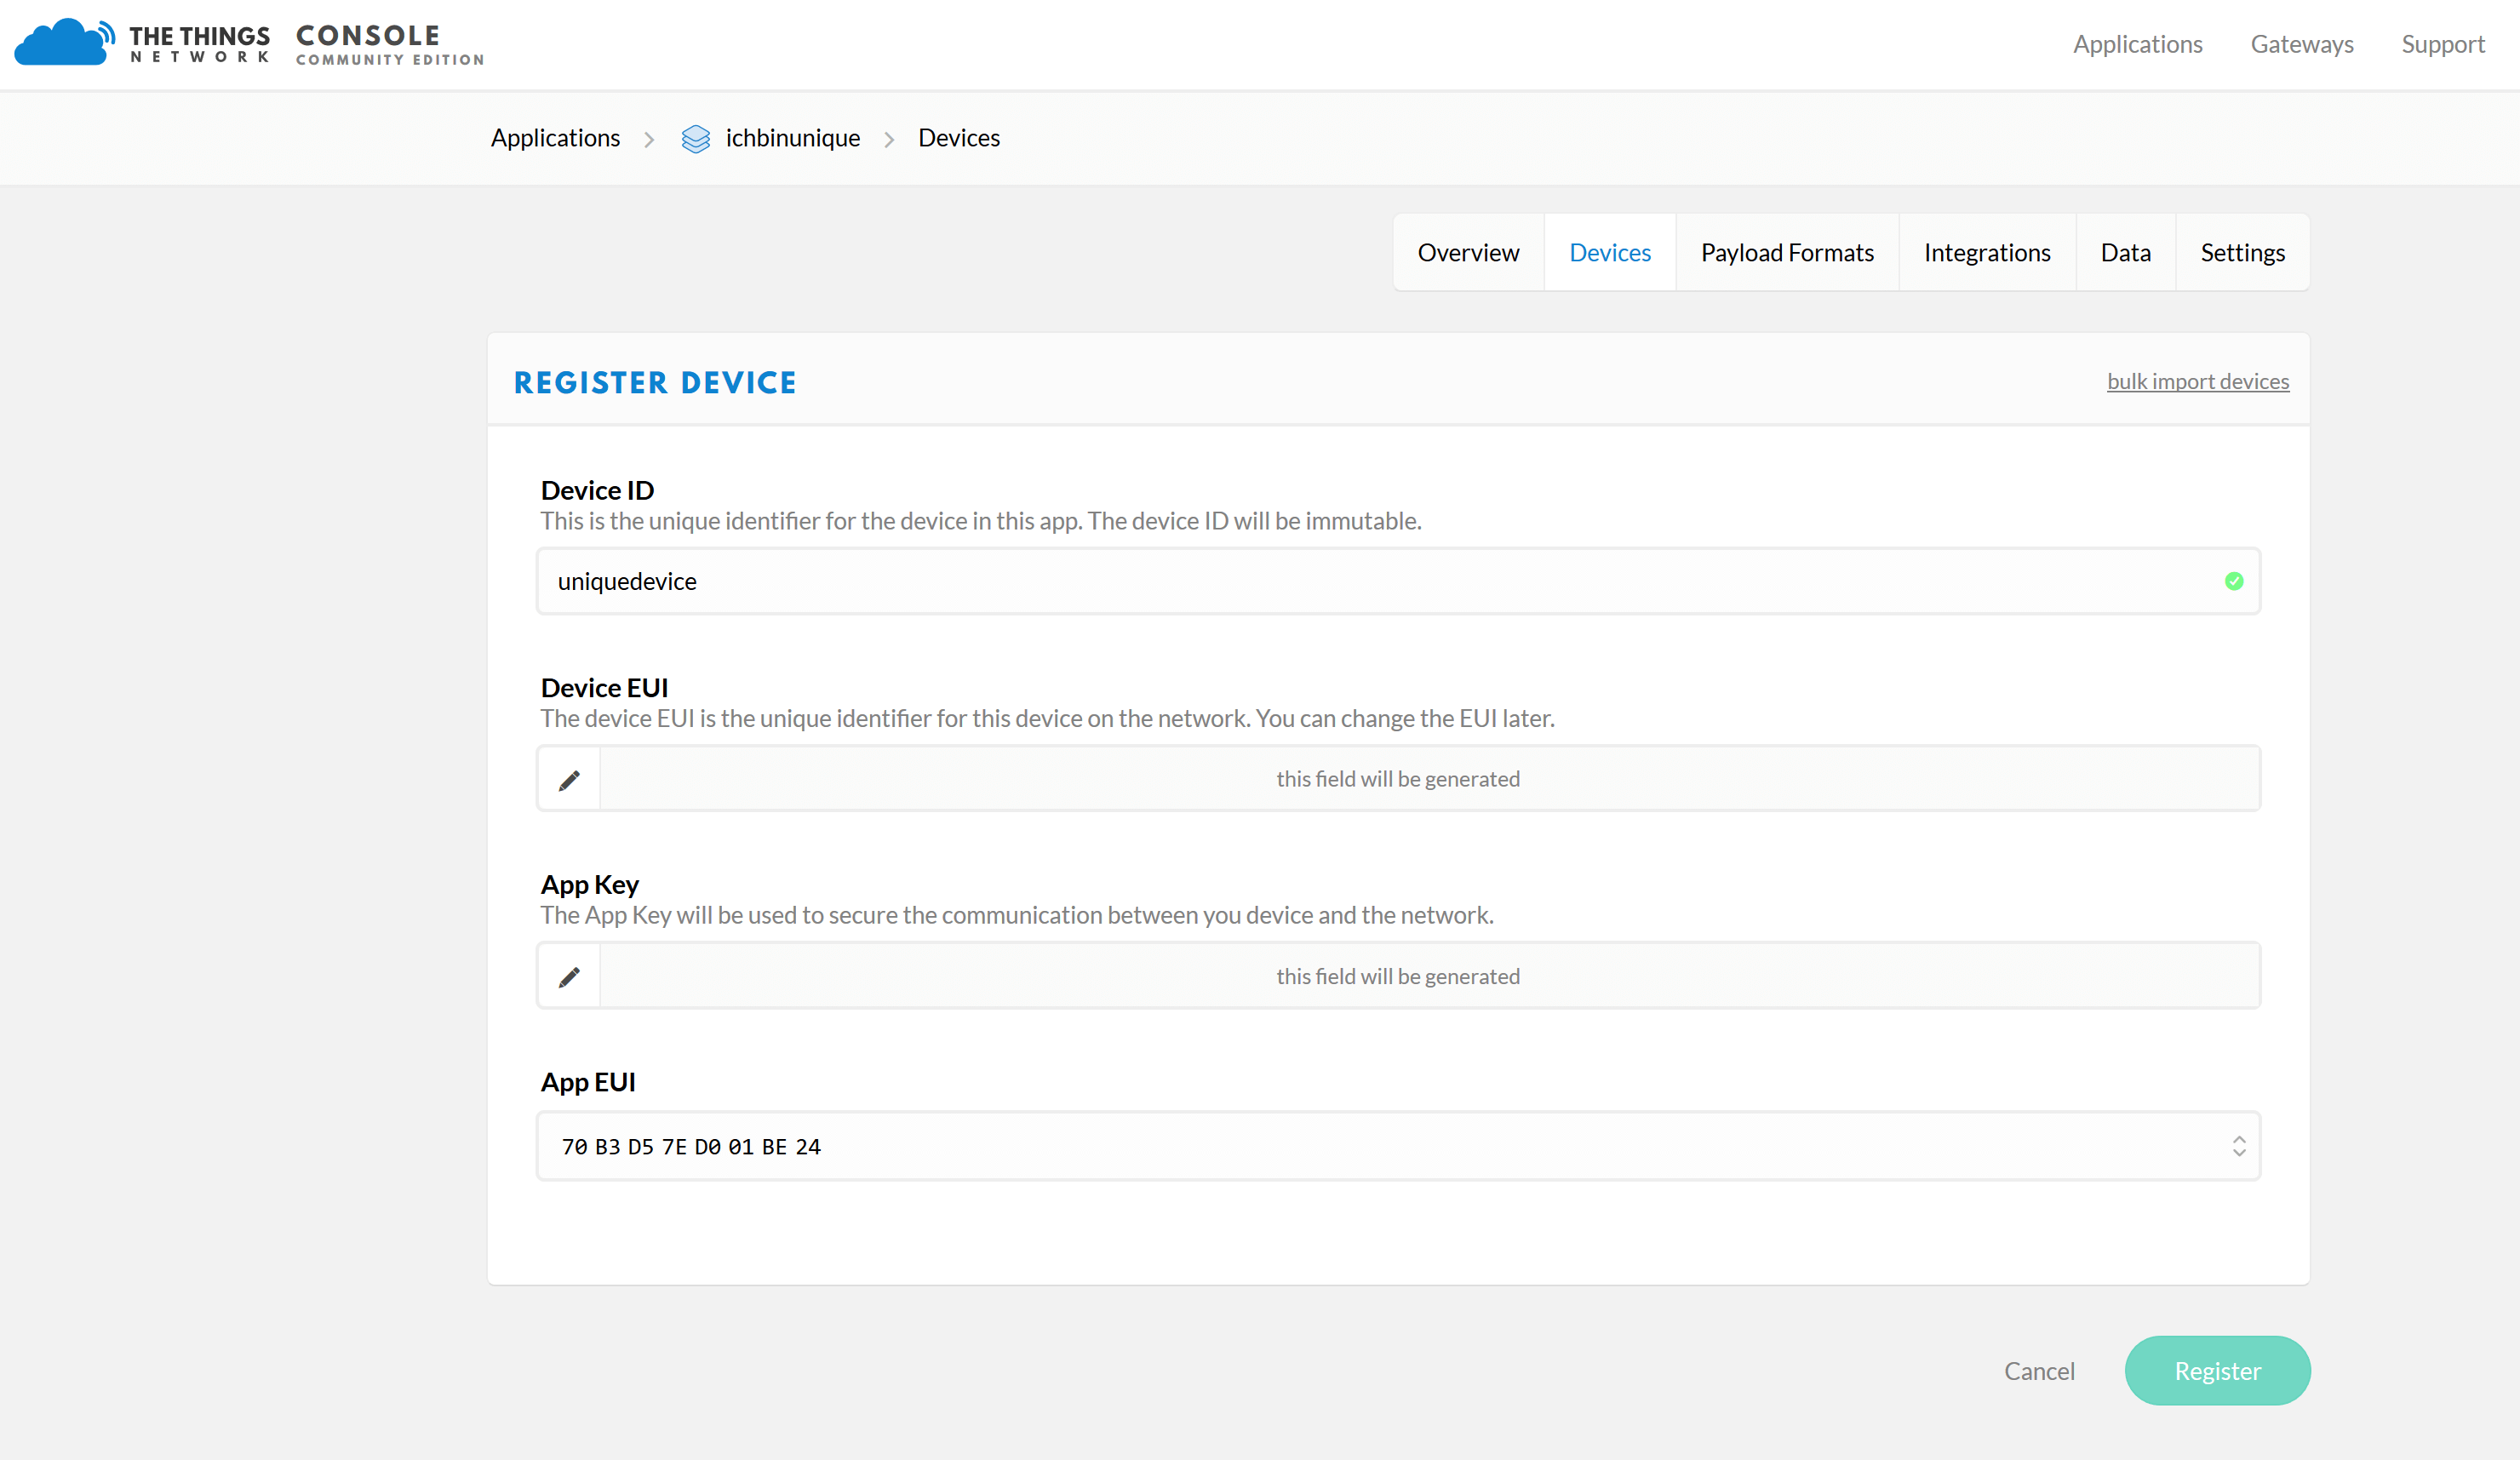
Now you have to add a Device in your new application. To do this, go to the “register device” section under “Devices”. Give your Device a “Device ID”. By clicking on the looped arrows (“generate”) at “DeviceEUI” a DeviceEUI is generated automatically.
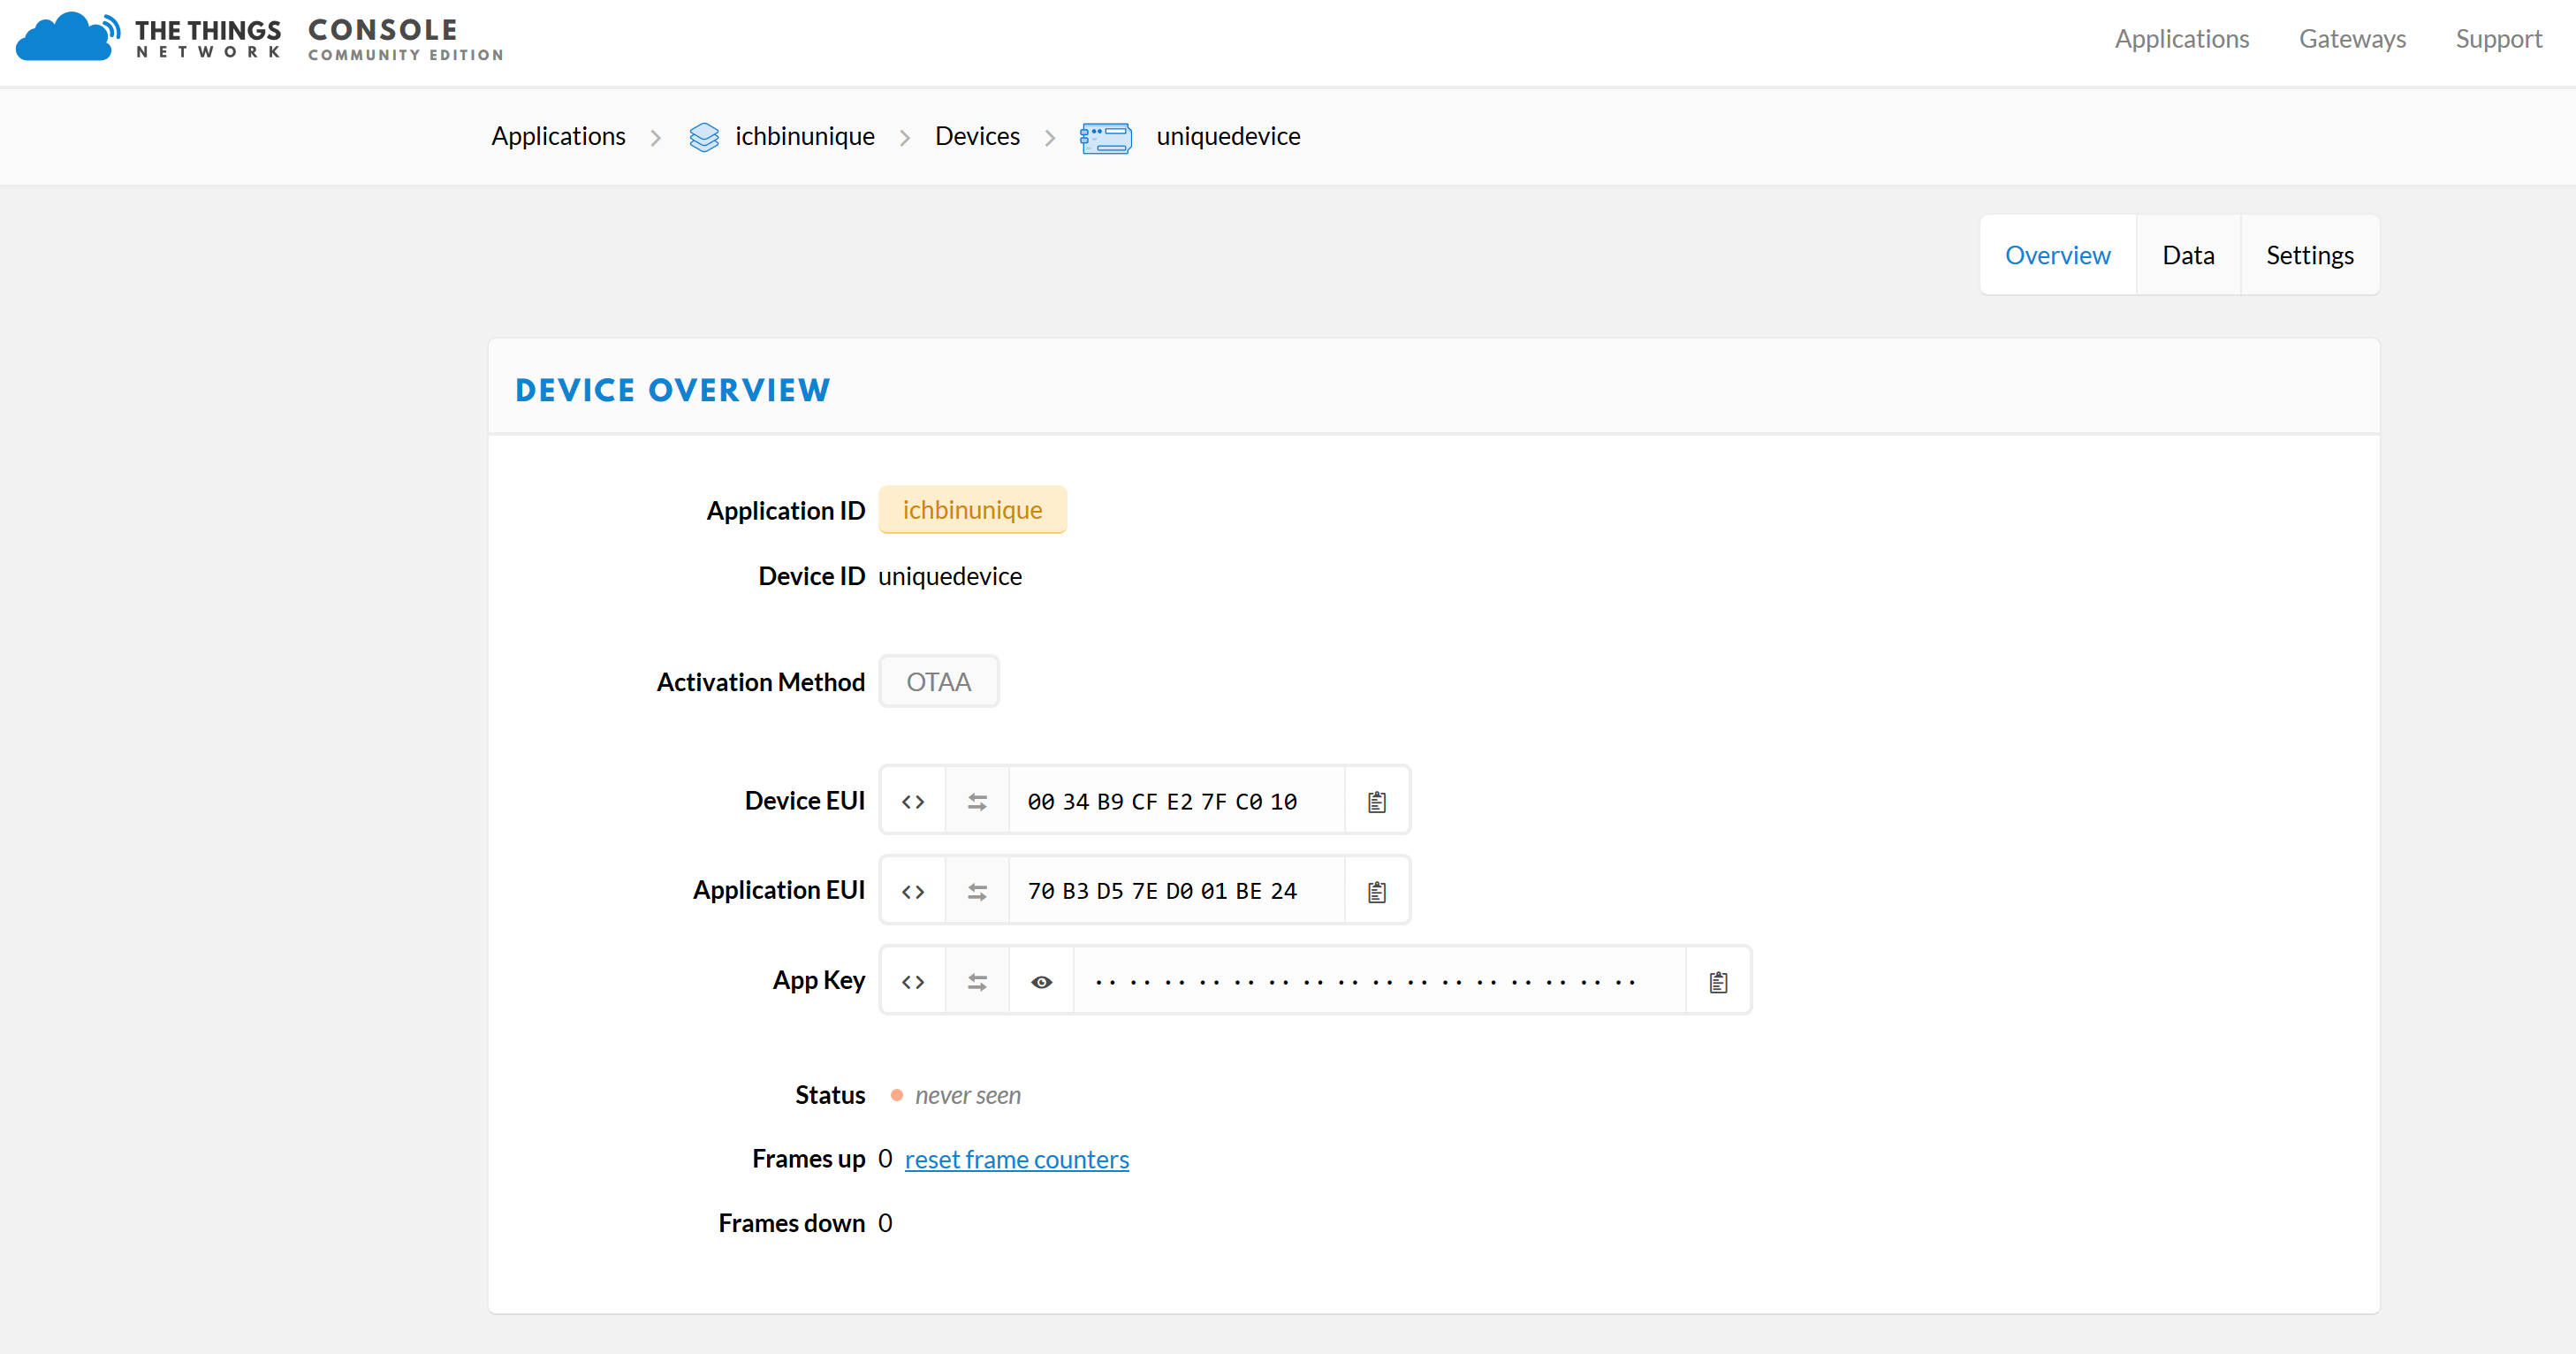
Then click on “Register” and you will get the following overview with the “Application ID” and the “Device ID”.
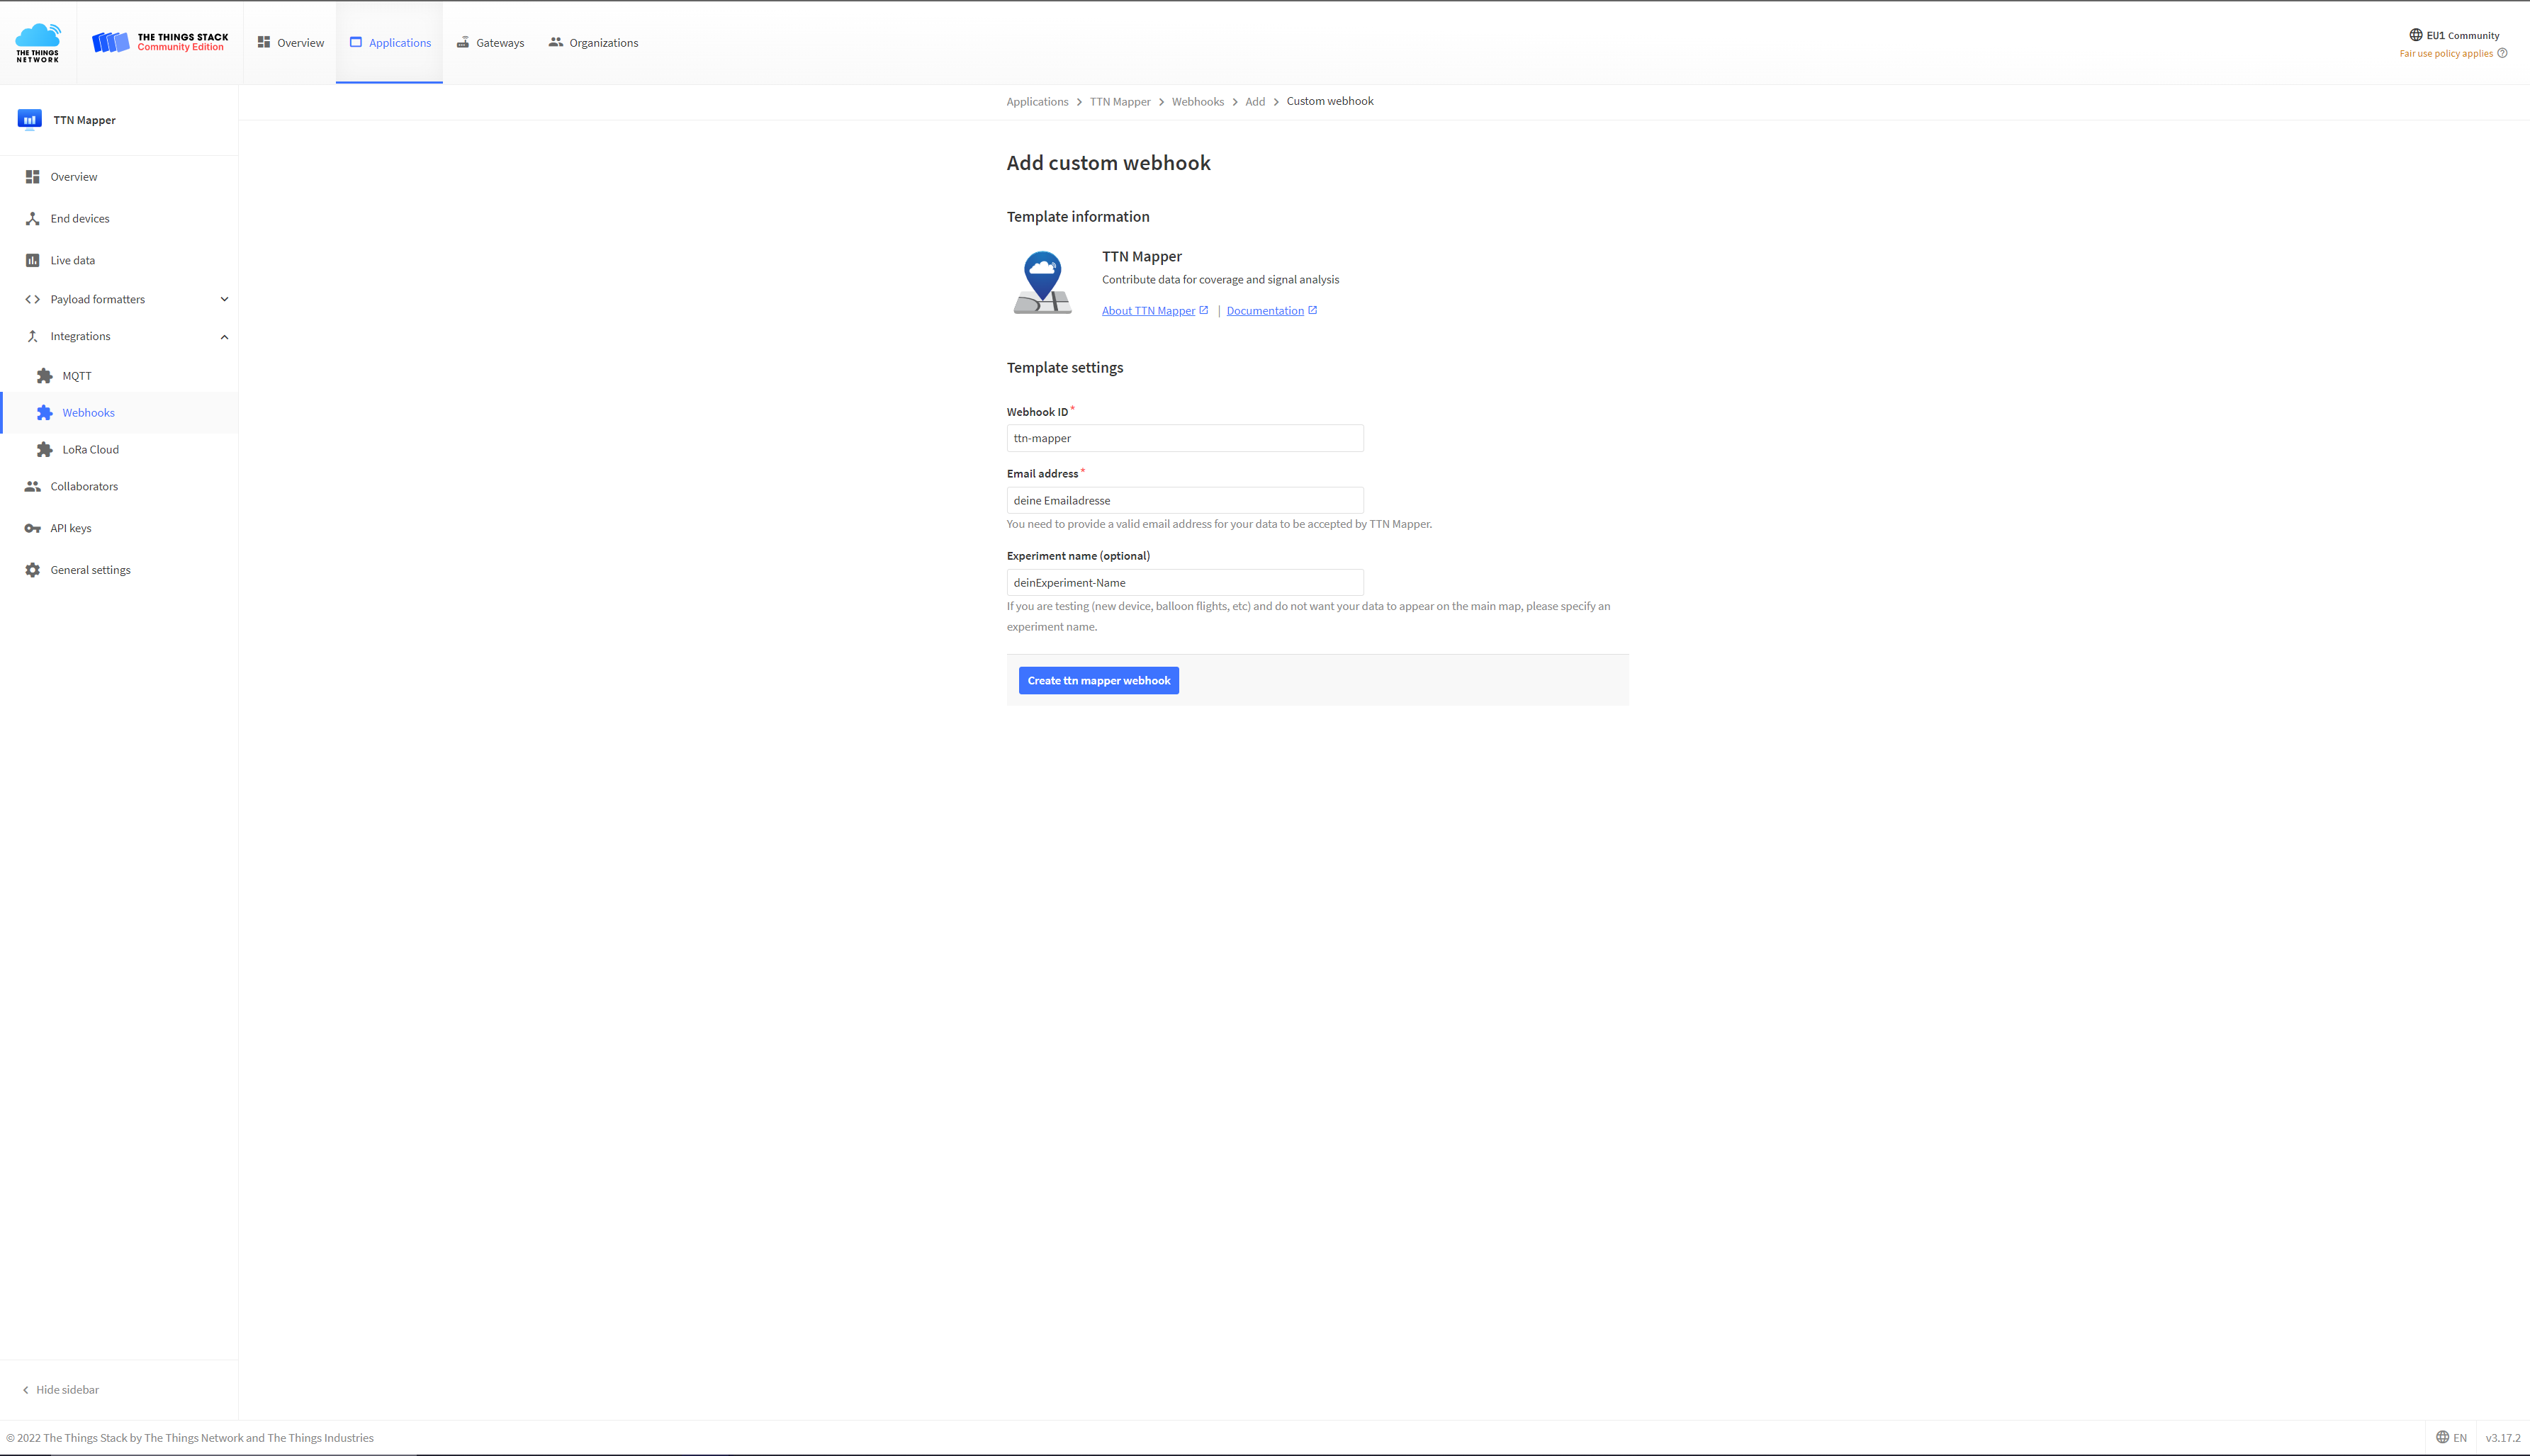
Since the data is to be sent to the TTN Mapper later, you still need a so-called “integration”. You can find it in your menu above. Click on it and then click on the button with the label “Add Integration”. There you have the possibility to add various integrations to forward the data from TTN to other services. Select the “TTN Mapper” there. Now enter a “Process ID”, which you can choose freely. Then enter your E-Mail address and specify an experiment name. Please use your own experiment name. You can also omit the experiemt name but you won’t be able to identify your own measurements on TTN Mapper. Then click on “Add Integration”.
Last but not least we need to change the Payload Format in order to send Cayenne LPP messages to TTN Mapper. To do so, click on the Payload Format tab and select Cayenne LPP and click “save”. Now, TTN decodes the payload based on the Cayenne LPP specification.

Blockly
Open Blockly and start developing code for your senseBox MCU. As we want to use TTN’s infrastructure, we need to perform an activation. Select the OTAA activation. Depending on your needs, you can change the transmission interval. Keep in mind that TTN runs on a fair use policy, which means that you should keep your transmission rate as low as possible.
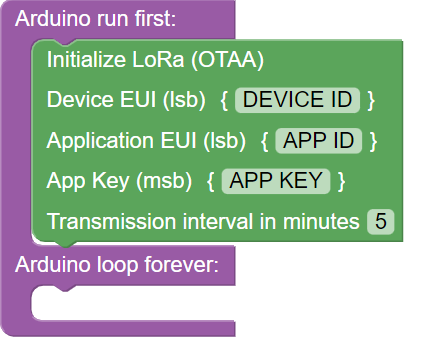
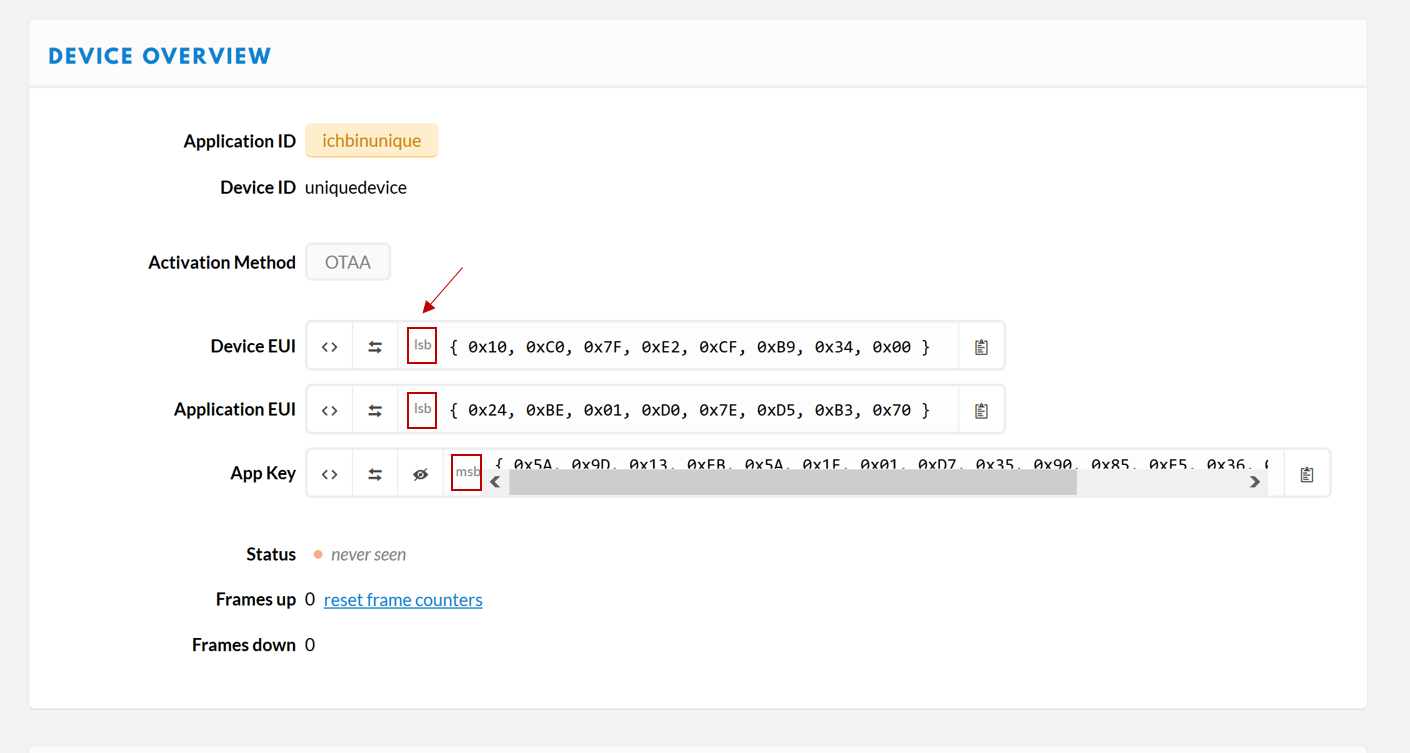
Insert your TTN keys now. Here it is important to use the correct format of the keys. The “Device EUI” and the “Application EUI” are stored in lsb format. The AppKey in msb format.
When copying the keys you must therefore make sure that your Device Overview is set up as shown in the following picture. You can change the format of the display by pressing the icons at the beginning (<> and ⇆)
There are different ways of sending LoRa data. We want to use the Cayenne Low Power Payload (LPP) in this case as it’s quite easy to use. However, please keep in mind the following information by TTN Mapper.
When using the Cayenne LPP data format, the GPS coordinates will be decoded into a different JSON format which is also supported. Cayenne LPP does not contain the GPS accuracy, and therefore this data will be considered as inferior and will carry less weight in calculation of coverage, and will be deleted first during data cleanup. Source
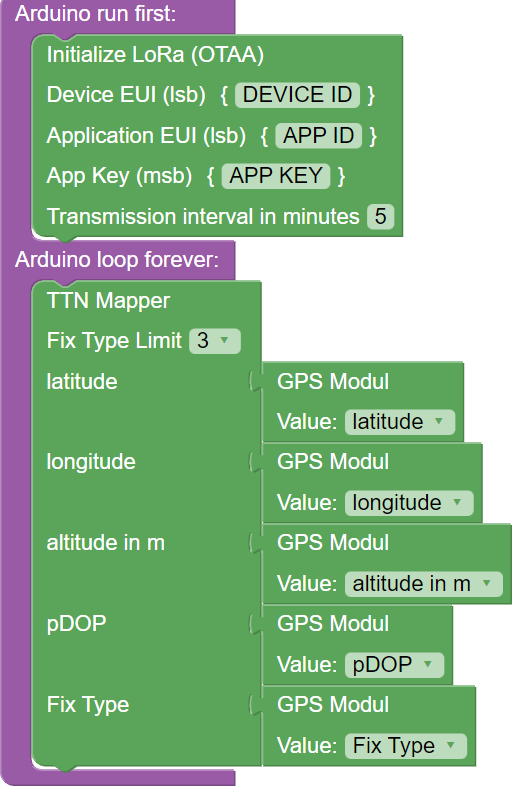
Add the TTN Mapper Block and send a Latitude, Longitute and Altitude message. Insert the corresponding GPS block here. You don’t need to change the channel.
Compile the sketch and upload it to the senseBox MCU. The senseBox should now look for GPS data and transmit them to TTN which forwards them to TTN Mapper.
Connect your external power supply and you are ready to measure LoRa connectivity in your neighborhood.
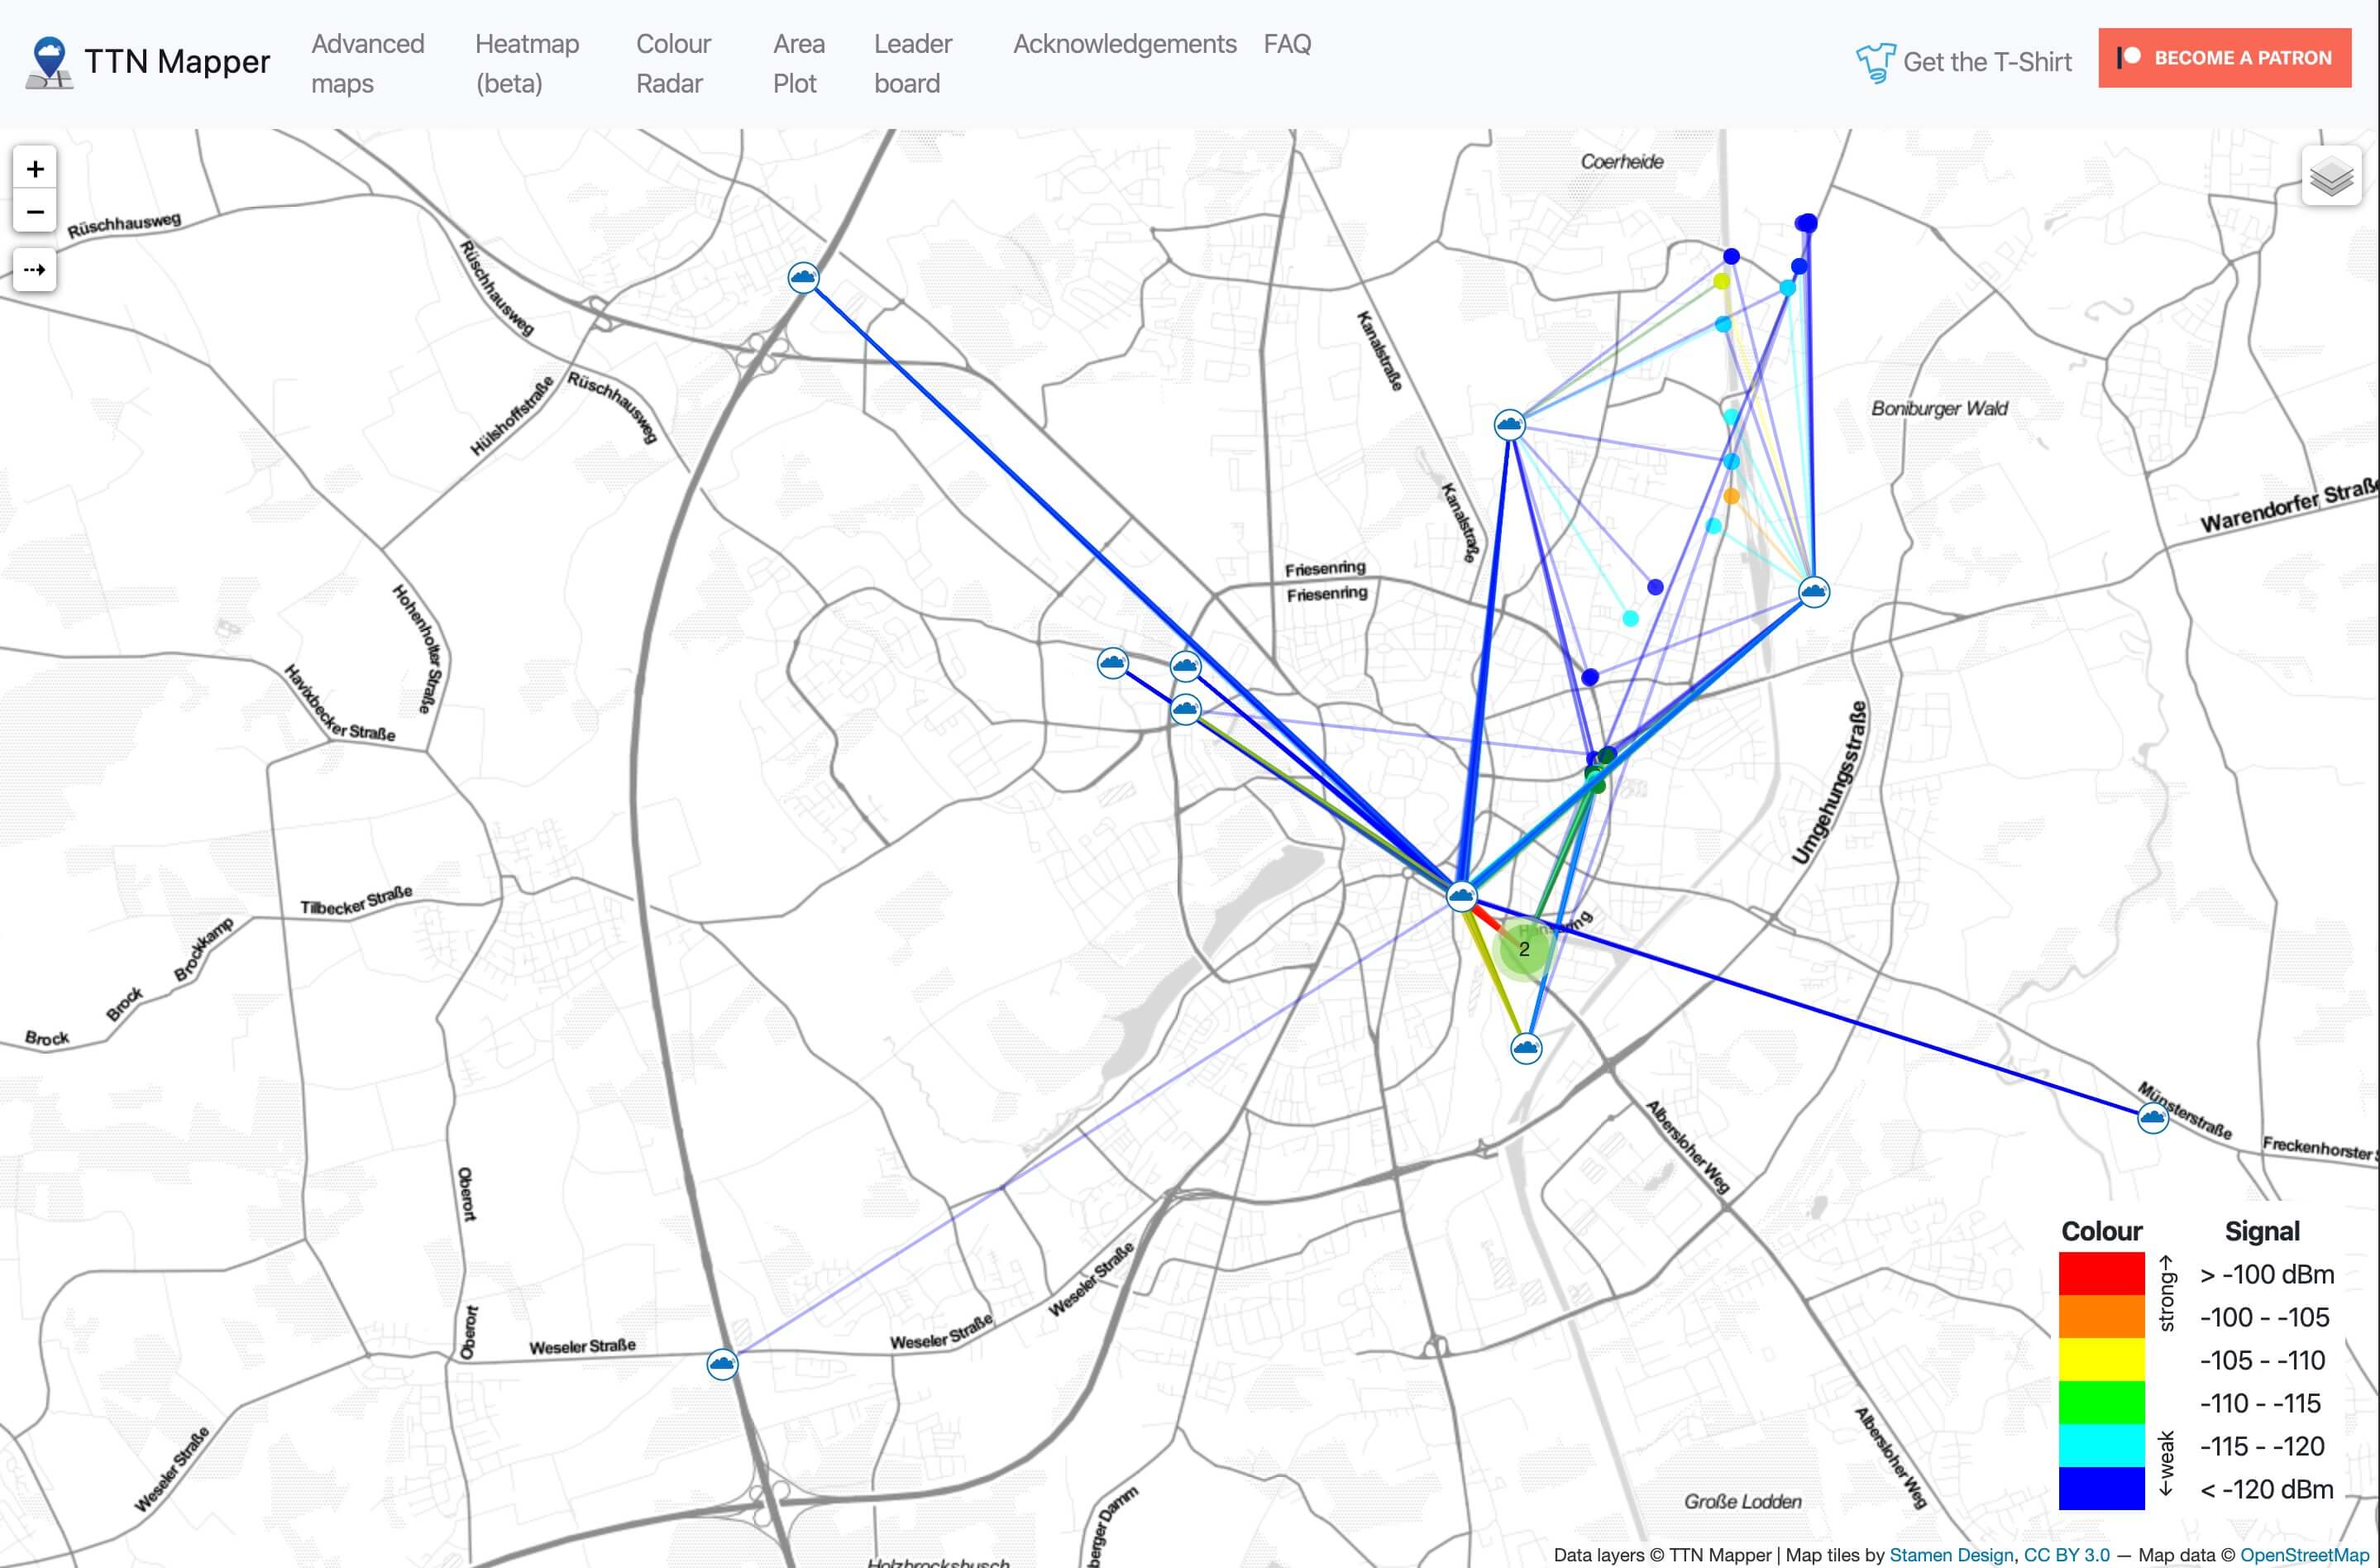
TTN Mapper
You can find your personal TTN Mapper under your specific experiment name. Visit
https://ttnmapper.org/experiments/?experiment=EXPERIMENT_NAME
and replace EXPERIMENT_NAME with your experiment name. It can take a while until the senseBox got GPS data. Reload the page to see the latest measurements.
Troubleshooting
You can check the incoming LoRa data in your TTN console. In your application, click the Data tab and you will see incoming messages. If there are no messages, please check your EUIs and their format. If there is no TTN coverage in your area, you will also not be able to see incoming messages.
Please notice that it can take quite a while until the GPS module receives GPS data. Sometimes, it takes up to multiple hours on the first time. After the module successfully received some information, it usually won’t take that long on the next time. It helps to insert a small coin cell to the GPS module.
Entire Code
You can find the finished Blockly Code here.