CO2 Ampel
In diesem Projekt zeigen wir dir, wie du eine CO2 Ampel mit CircuitPython programmieren kannst. Die CO2 Ampel misst die CO2-Konzentration in der Luft und zeigt dir an, ob die Luftqualität in deinem Raum gut oder schlecht ist.
Material
- senseBox MCU-S2
- SDC30 CO2 Sensor
- LED Matrix
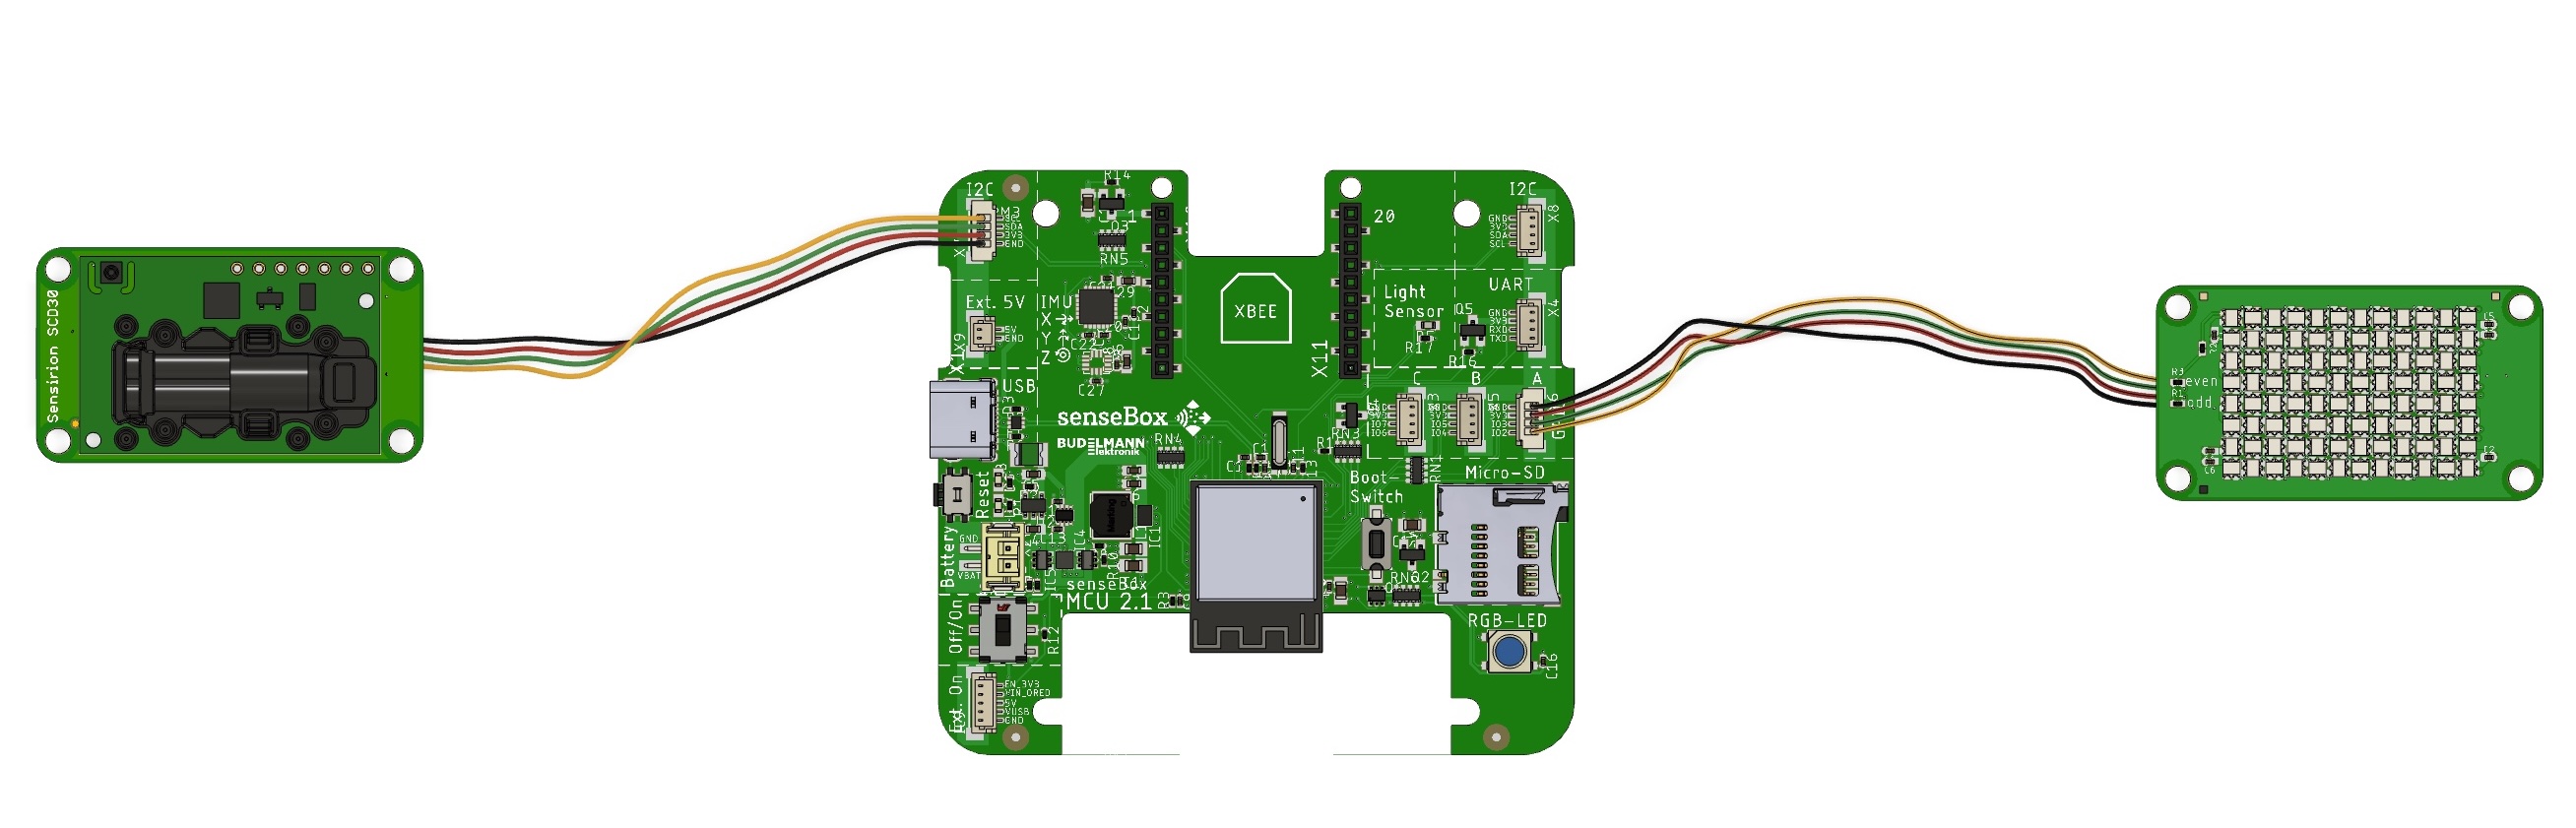
Aufbau
Verbinde den SCD30 CO2 Sensor über I2C mit der senseBox MCU-S2. Verbinde die LED Matrix an GPIO A.
Programmierung
Bibliotheken installieren
Um den SCD30 CO2 Sensor und die LED Matrix mit CircuitPython verwenden zu können, musst du die folgenden Bibliotheken installieren:
- Adafruit Bus Device
- Adafruit Register
- Adafruit NeoPixel
- Adafruit Framebuf
- Adafruit Pixel Framebuf
- Adafruit LED Animation
- Adafruit SCD30
Du kannst die Bibliotheken hier herunterladen und in den lib Ordner auf deiner senseBox MCU-S2 kopieren.
Programmcode - Libraries importieren
Importiere die benötigten Bibliotheken und initialisiere den SCD30 CO2 Sensor und die LED Matrix.
import board
import neopixel
import digitalio
from adafruit_pixel_framebuf import PixelFramebuffer
import time
import adafruit_scd30
import math

# IO Enable
io_enable_pin = digitalio.DigitalInOut(board.IO_POWER)
io_enable_pin.direction = digitalio.Direction.OUTPUT
io_enable_pin.value = False

# SCD30 CO2
i2c = board.I2C()
scd = adafruit_scd30.SCD30(i2c)

# LED Matrix
pixel_pin = board.D2
pixel_width = 12
pixel_height = 8
num_pixels = pixel_width * pixel_height
pixels = neopixel.NeoPixel(
    pixel_pin, num_pixels, brightness=0.05, pixel_order=neopixel.GRB, auto_write=False
)
Programmcode - Pixel Framebuffer
Mit dem Pixel Framebuffer kannst du die LED Matrix steuern. Erstelle ein Pixel Framebuffer Objekt und initialisiere es mit den Pixeln, der Breite und Höhe der LED Matrix.
pixel_framebuf = PixelFramebuffer(
    pixels,
    pixel_width,
    pixel_height,
    alternating=True,
)
Programmcode - Map Funktion
Die Map Funktion transformiert einen Wert von einem Bereich in einen anderen Bereich. In diesem Fall wird der Wert der CO2-Konzentration in einen Wert zwischen 1 und der Breite der LED Matrix transformiert.
# Map function transform value from one range to another
def mapRange(value, inMin, inMax, outMin, outMax):
    value = outMin + (((value - inMin) / (inMax - inMin)) * (outMax - outMin))
    return math.floor(value)
Programmcode - Loop
In der while Schleife überprüfst du, ob Daten vom SCD30 CO2 Sensor verfügbar sind. Wenn Daten verfügbar sind, wird die CO2-Konzentration in ppm gemessen und in einen Wert zwischen 1 und der Breite der LED Matrix transformiert. Anschließend wird die LED Matrix mit der entsprechenden Farbe gefüllt.
while True:
    if scd.data_available:
        co2_value = scd.CO2
        width = mapRange(co2_value, 400, 2000, 1, pixel_width)
        color = 0xFF0000
        if(co2_value < 1000):
            color = 0x00FF00
        elif(co2_value < 1500):
            color = 0xFFFF00
        pixel_framebuf.fill(0x000000)
        pixel_framebuf.fill_rect(0, 0, width, pixel_height, color)
        pixel_framebuf.display()
Hier findest du den ganzen Code
import board
import neopixel
import digitalio
from adafruit_pixel_framebuf import PixelFramebuffer
import time
import adafruit_scd30
import math

# IO Enable
io_enable_pin = digitalio.DigitalInOut(board.IO_POWER)
io_enable_pin.direction = digitalio.Direction.OUTPUT
io_enable_pin.value = False

# SCD30 CO2
i2c = board.I2C()
scd = adafruit_scd30.SCD30(i2c)

# LED Matrix
pixel_pin = board.D2
pixel_width = 12
pixel_height = 8
num_pixels = pixel_width * pixel_height
pixels = neopixel.NeoPixel(
    pixel_pin, num_pixels, brightness=0.05, pixel_order=neopixel.GRB, auto_write=False
)

pixel_framebuf = PixelFramebuffer(
    pixels,
    pixel_width,
    pixel_height,
    alternating=True,
)

# Map function transform value from one range to another
def mapRange(value, inMin, inMax, outMin, outMax):
    value = outMin + (((value - inMin) / (inMax - inMin)) * (outMax - outMin))
    return math.floor(value)

while True:
    if scd.data_available:
        # Zeige CO2-Konzentration als Rechteck an
        co2_value = scd.CO2
        # Transform CO2 value (400 - 2000 ppm) to pixel width (1 - pixel_width)
        width = mapRange(co2_value, 400, 2000, 1, pixel_width)
        color = 0xFF0000                                  # CO2 value >= 1500 ppm -> red
        if(co2_value < 1000):                             # CO2 value < 1000 ppm -> green
            color = 0x00FF00
        elif(co2_value < 1500):                           # CO2 value < 1500 ppm -> yellow
            color = 0xFFFF00
        pixel_framebuf.fill(0x000000)                     # Clear LED Matrix before drawing
        pixel_framebuf.fill_rect(0, 0, width, pixel_height, color)
        pixel_framebuf.display()
Deine CO2 Ampel
Du hast es geschafft! Du hast eine CO2 Ampel mit CircuitPython programmiert. Jetzt kannst du die CO2-Konzentration in deinem Raum messen und die Luftqualität überwachen. Die LED Matrix zeigt dir an, ob die Luftqualität gut oder schlecht ist. Bei einer hohen CO2-Konzentration wird die LED Matrix rot, bei einer niedrigen CO2-Konzentration wird die LED Matrix grün. Mit einem Druck auf den Button kannst du dir die aktuelle CO2-Konzentration in ppm anzeigen lassen.
Viel Spaß mit deiner CO2 Ampel! 🚦
Expert*innen Aufgabe
Versuche die CO2 Ampel zu erweitern, indem du bei einem Druck auf den Button die CO2-Konzentration in ppm anzeigen lässt.
Font
Lade dir die font5x8.bin Datei herunter und kopiere ihn in den CIRCUITPY Ordner auf deiner senseBox MCU-S2. Damit kannst du Text auf der LED Matrix anzeigen.
Button hinzufügen
Füge den Button hinzu und setze ihn als Input. In der btn_state Variable speicherst du den aktuellen Zustand des Buttons.
# BTN
btn = DigitalInOut(board.BUTTON)
btn.direction = Direction.INPUT
btn.pull = Pull.UP
btn_state = btn.value
In der while Schleife überprüfst du, ob der Button gedrückt wurde. Wenn der Button gedrückt wurde, wird die CO2-Konzentration in ppm auf der LED Matrix angezeigt.
while True:
    btn_state = btn.value
    if btn_state:
        time.sleep(0.05)
        btn_state = btn.value

    time.sleep(0.1) # sleep for debounce
    ...
Text anzeigen
Du kannst nun den btn_state verwenden, um den Status des Buttons zu überprüfen. Nutze dafür eine if-Abfrage. Wenn der Button gedrückt wurde, wird die CO2-Konzentration in ppm auf der LED Matrix angezeigt.
if btn_state:
   # Zeige CO2-Konzentration als Rechteck an
   ...
else:
    # Zeige CO2-Konzentration als Text an
    text = "CO2: " + str(scd.CO2) + " ppm"
    for i in range(6 * len(text) + pixel_width):                    # Text scrollt von rechts nach links
        pixel_framebuf.fill(0x000000)
        pixel_framebuf.text(text, pixel_width - i, 0, 0xFF00FF)
        pixel_framebuf.display()
        time.sleep(0.05)                                            # Scrollgeschwindigkeit
Hier findest du den ganzen Code der Expert*innen Aufgabe
import board
import neopixel
import digitalio
from adafruit_pixel_framebuf import PixelFramebuffer
import time
import adafruit_scd30
import math
from digitalio import DigitalInOut, Direction, Pull

# IO Enable
io_enable_pin = digitalio.DigitalInOut(board.IO_POWER)
io_enable_pin.direction = digitalio.Direction.OUTPUT
io_enable_pin.value = False

# SCD30 CO2
i2c = board.I2C()
scd = adafruit_scd30.SCD30(i2c)

# BTN
btn = DigitalInOut(board.BUTTON)
btn.direction = Direction.INPUT
btn.pull = Pull.UP
btn_state = btn.value

# LED Matrix
pixel_pin = board.D2
pixel_width = 12
pixel_height = 8
num_pixels = pixel_width * pixel_height
pixels = neopixel.NeoPixel(
    pixel_pin, num_pixels, brightness=0.05, pixel_order=neopixel.GRB, auto_write=False
)

pixel_framebuf = PixelFramebuffer(
    pixels,
    pixel_width,
    pixel_height,
    alternating=True,
)

# Map function transform value from one range to another
def mapRange(value, inMin, inMax, outMin, outMax):
    value = outMin + (((value - inMin) / (inMax - inMin)) * (outMax - outMin))
    return math.floor(value)

while True:
    btn_state = btn.value
    if btn_state:
        time.sleep(0.05)
        btn_state = btn.value

    time.sleep(0.1) # sleep for debounce

    if scd.data_available:
        if btn_state:
            # Zeige CO2-Konzentration als Rechteck an
            co2_value = scd.CO2
            width = mapRange(co2_value, 400, 2000, 1, pixel_width)
            color = 0xFF0000
            if(co2_value < 1000):
                color = 0x00FF00
            elif(co2_value < 1500):
                color = 0xFFFF00
            pixel_framebuf.fill(0x000000)
            pixel_framebuf.fill_rect(0, 0, width, pixel_height, color)
            pixel_framebuf.display()
        else:
            # Zeige CO2-Konzentration als Text an
            text = "CO2: " + str(scd.CO2) + " ppm"
            for i in range(6 * len(text) + pixel_width):
                pixel_framebuf.fill(0x000000)
                pixel_framebuf.text(text, pixel_width - i, 0, 0xFF00FF)
                pixel_framebuf.display()
                time.sleep(0.05)
</div>